

Dear reoqoo user,Wireless connection process:
Click the following blue text to view the operation video:
◆ Outdoor Camera Quick Setup Guide
◆ Smart Camera Quick Setup Guide
1.Download and Install App: Ensure your phone is connected to Wi-Fi. Download and install the latest version of the reoqoo App from the App Store. Complete registration and login.
2.Start the Device: Power on the Camera and wait for the “Hello reoqoo” voice prompt. If no sound is heard, press and hold the reset button for 5 seconds to reset the device.
3.Add Device: Open the App and go to the “Home” interface on the homepage. Click the “+” icon in the top right corner, then select “Add device.”
4.Scan QR Code: Use the App to scan the QR code displayed on the Camera to identify it.
5.Confirm Wi-Fi: On the next interface, verify if the Wi-Fi name displayed in the App matches your phone’s connected Wi-Fi. Enter the correct Wi-Fi password and click “Next.”
Note: If your phone cannot detect the Camera in the App, follow the instructions on the interface to connect to the hotspot named XT-XXXX in the Wi-Fi list.
6.Wait for Network Configuration: The Camera will begin connecting to the network. Please be patient during this process.
7.Naming and Setup Completion: Once the device successfully connects to the network, assign a recognizable name to the Camera and begin using its functions.
Dear reoqoo user,There are two ways to reset the reoqoo outdoor camera and reconnect to the network:
Method 1 (In-App Reset):
a. When the Camera is online, find it on the reoqoo App homepage. Click “∷” to access settings, select the Camera for deletion, and confirm. Then, follow the initial setup process to reconnect to the network.
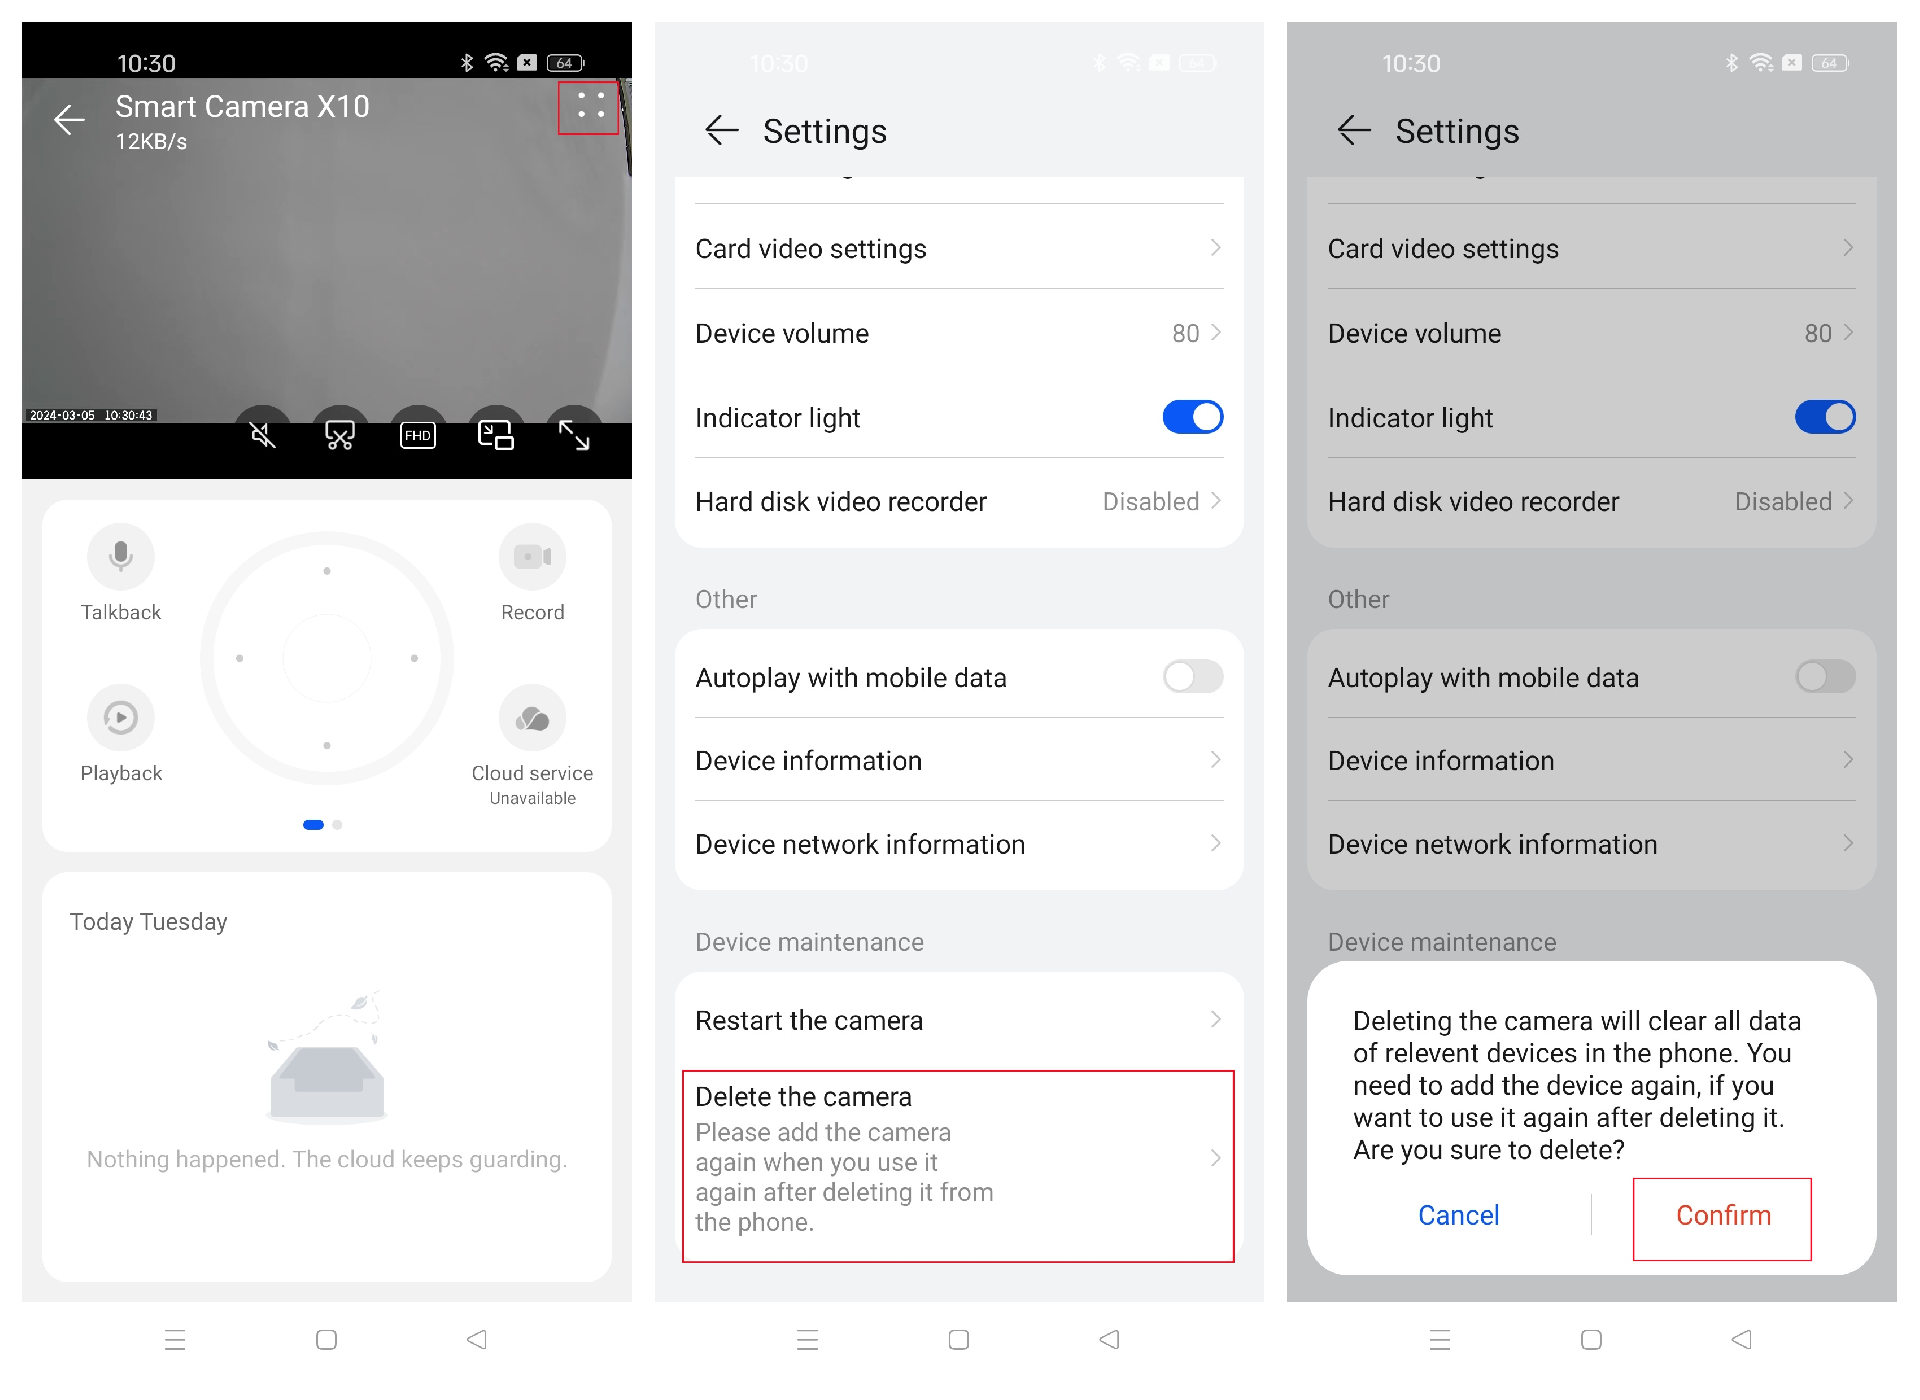
b. Press and hold the monitoring card, then click to delete the device.
Method 2 (Hardware Reset): Two minutes after powering on, press and hold the reset button for 5 seconds until you hear the voice prompt “Hello reoqoo.” Release the button, and the device will restore to factory settings. Follow the initial setup steps to complete network configuration.
Two Points to Note:
1. If you wish to add a camera already bound to another account, unbind it from the old account before adding it to the new one.
2. If the Camera uses a Micro SD card for recordings, format the SD card in the settings after adding it to a new account.
Dear reoqoo user,You can add up to 100 devices, including reoqoo Cameras, to one account.
Dear reoqoo user,Sharing your reoqoo Camera with other users is a simple process:
1. Download and Install reoqoo App: All phones must download and install the reoqoo App and register/log in to their respective accounts.
2. Add Camera on Main Account Phone: On the main account phone, enter the homepage of the reoqoo App, click the “+” icon in the top right corner, select “Add Device,” and follow the instructions to connect the Camera.
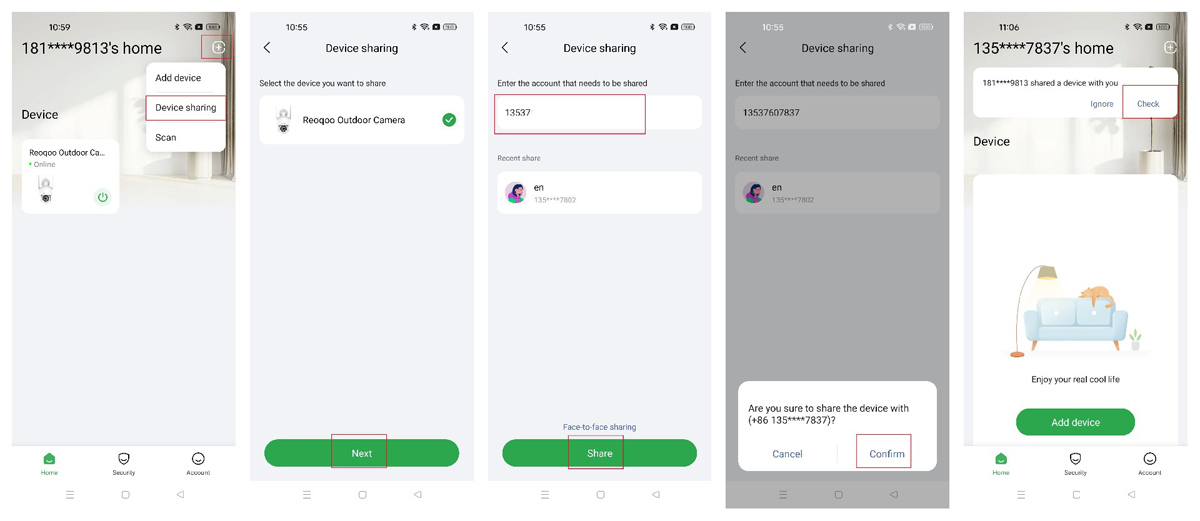
3. Share Device: Once successfully added, use the main account to navigate to the App homepage, click the monitoring card, then select “Share device.” Choose the Camera to be shared, confirm, enter the recipient’s reoqoo account, and send the sharing invitation.
4. Accept Invitation: The recipient will receive a device-sharing notification in their reoqoo App. Upon acceptance, they can start using the shared Camera.
Dear reoqoo user,There are two methods to reconnect the reoqoo Camera after replacing the router or changing the Wi-Fi password:
Method A (Fast Reset):
a. Press and hold the reset button at the back of the Camera for 5 seconds until you hear a voice prompt. The device will automatically restore factory settings.
b. Follow the initial device setup process on the reoqoo App to reconnect and configure the new Wi-Fi information.
Method B (Keep Wi-Fi Name and Password the Same):
a. Set the Wi-Fi name and password of the new router to be the same as those of the old router.
b. The Camera can usually search and connect to a Wi-Fi network with the same name and password automatically without requiring a manual reset. If it fails to connect automatically, restart the Camera or check the connection status in the App.
Dear reoqoo user,If the Camera does not respond after long-pressing the reset button after powering on, follow these steps:
1. Confirm Reset Duration: Ensure you hold the reset hole with a pin for at least 5 seconds, as this is the minimum duration required for the reset function.
2. Check for Interference: Remove all external interference factors such as extension cords, backup power supplies, and memory cards. Use only the original power adapter and cable. Retry the reset operation.
If you have strictly followed the above steps and have not received the voice prompt indicating a successful reset or any response from the device after pressing the reset button for at least 5 seconds multiple times (at least three times),it’s likely due to equipment hardware failure. At this stage, we advise contacting our seller partner to explore the possibility of returning the product for repair. Rest assured, we’ll help you navigate this process efficiently to resolve the issue promptly with your device.
Dear reoqoo user,If the Camera fails to add during the progress between 0% and 40%, you can troubleshoot as follows:
1. Check Network Connection: Ensure your phone is connected to the same router’s Wi-Fi network as the Camera.
2. Confirm Reset Process: Press and hold the reset button on the tail line for at least 5 seconds until you hear a clear “Hello reoqoo” voice prompt from the Camera. The Camera will conduct an automatic 360-degree self-check rotation. Then, proceed with network setup.
3. Reinstall App: If the issue persists, uninstall and reinstall the reoqoo App and restart your phone. This may resolve the problem by refreshing the system environment.
If the Camera cannot reset and connect to the network after these steps, it may indicate a hardware failure,At this stage, we advise contacting our seller partner to explore the possibility of returning the product for repair. Rest assured, we’ll help you navigate this process efficiently to resolve the issue promptly with your device.
Dear reoqoo user,When the Camera fails between 41%-46% progress, you can troubleshoot it according to the following instructions:
1. Verify Wi-Fi Password:
a. Use another phone to scan the QR code in the Wi-Fi settings of the phone currently connected.
b. Enter the Wi-Fi settings and find the Wi-Fi for the Camera.
c. Generate the QR code and use the other phone to scan and check if the displayed password matches the one you entered when setting up the Camera.
d. If you have only one phone, screenshot and save the QR code in the Wi-Fi settings, then use apps with scanning capabilities (such as WeChat) to verify the password.
e. You can also delete the connected Wi-Fi network in the phone’s Wi-Fi settings and manually re-enter the password during reconnection. Make sure to correctly enter the case-sensitive password during a reconnection attempt.
2. Check Network Environment:
a. When adding the Camera, ensure that your phone is connected to the router instead of the Wi-Fi signal directly provided by the optical modem.
b. If you are connected to Wi-Fi provided by an optical modem, it is recommended that you switch to the Wi-Fi network provided by the router before adding the Camera. Note: Routers are usually more conducive to stable device networking than optical modems.
c. If there is only an optical modem at home, you can disconnect all devices connected to the optical modem except the phone used for network configuration to ensure sufficient network resources. Then, use the mobile phone to add and configure the Camera to see if the network can be successfully configured.
By carefully troubleshooting and optimizing operations as mentioned above, you can successfully resolve Wi-Fi network issues with the Camera.
Dear reoqoo user, if the issue persists after attempting the steps mentioned above, don’t worry. We understand your frustration and are here to help. To better assist you, please click on the problem feedback and provide the following:
1. A detailed description of the issue.
2. Video or screenshot evidence of the device malfunction.
Upon receipt, we’ll promptly investigate and address your concern and ensure a swift resolution.
Dear reoqoo user,Encountering a failed connection between 61% and 95% progress can be resolved with the following steps:
1. Restart the Router: Gently unplug the router, wait approximately 2 minutes, then plug it back in. Ensure your phone can connect to Wi-Fi and surf the Internet smoothly. Afterward, reset the Camera.
2. Check Distance and Obstacles: Ensure there are no obstacles between the Camera and the router, and the distance does not exceed 8 meters. Ideally, keep the Camera within two regular walls or one load-bearing wall for optimal wireless signal transmission.
3. Confirm Firewall Settings: Access your router’s management interface and verify if any firewall or Wi-Fi freeloader prevention functions are enabled. Temporarily disable these functions and attempt to add the Camera again.
Dear reoqoo user, if the issue persists after attempting the steps mentioned above, don’t worry. We understand your frustration and are here to help. To better assist you, please click on the problem feedback and provide the following:
1. A detailed description of the issue.
2. Video or screenshot evidence of the device malfunction.
Upon receipt, we’ll promptly investigate and address your concern and ensure a swift resolution.
Dear reoqoo user,Encountering a failed connection between 96% and 99% progress can be addressed as follows:
1. Check Phone’s Internet Access: Verify if the Wi-Fi connected to your phone can access the Internet normally. Ensure network signal and data transmission are unobstructed. If not, power off and restart the router to restore the network connection. Note: If the phone cannot access the Internet smoothly after powering off and restarting the router, it may indicate a problem with your network service. In this case, please contact your network operator to help solve the problem of network failure.
2. Reconfigure Network: Once network access is restored, reconfigure the network and attempt to add the Camera again.
Dear reoqoo user, if the issue persist after attempting the steps mentioned above, don’t worry.
We understand your frustration and are here to help. To better assist you, please click on the problem feedback and provide the following:
1. A detailed description of the issue.
2. Video or screenshot evidence of the device malfunceion.
Upon receipt, we’ll promptly investigate and address your concern and ensure a swift resolution.
Dear reoqoo user,If you encounter the “Device is offline” message in the App, follow these troubleshooting steps:
1. Check Power Supply: Replug the adapter or try a different socket. Ensure you’re using a DC 12V/1000mA adapter and power cord.
2. Delete and Add Again: Remove and re-add devices in the App.
3. Check Router Wi-Fi settings:
• Match the new router’s Wi-Fi name and password to those of the original network, then reconnect the Camera.
• If the Camera is connected to the optical modem Wi-Fi, change to the router Wi-Fi and reduce the number of devices connected to the optical modem to enhance stability.
• Restart the router and wait a few minutes to see if the Camera is back online.
• Adjust the positions of the router and Camera to ensure no obstructions, and the distance is within 8 m, not exceeding two regular walls or one load-bearing wall.
• Check whether the router’s firewall/Wi-Fi freeloader prevention function is enabled. If so, disable it and observe the Camera’s status.
• Check if the Wi-Fi network connected by the Camera is stable, and disconnect the mobile data connection on the phone to test the Internet access status.
4. Check the Micro SD Card: If the Camera has a built-in Micro SD card, remove the card and see if the Camera can come online normally. If it comes online normally without the card, there may be a problem with the existing memory card. We recommend replacing it with a new one for testing.
If the issue persists, unplug and replug the Camera. If normal operation isn’t restored, contact the seller for repair service, mentioning detailed issue descriptions and device information at c-service@reoqoo.com.
Hardware Troubleshooting:
• If it is originally connected via Internet cable, disconnect the cable.
• Restore the Camera to factory settings.
• Check if the device voice prompts “Hello reoqoo” and if the ‘XT-X31B-XXXXX’ hotspot appears in the phone’s Wi-Fi list. If it does not appear and software issues are ruled out, it may be a hardware fault. In that case, please contact the seller for repair service.
Dear reoqoo user,If your reoqoo Camera fails to provide a voice prompt or Camera does not automatically flip the image after being plugged in, follow these troubleshooting steps:
1. Check Power Cable and the camera: Ensure the power cable is securely plugged into both the camera and adapter interfaces. Try replugging it to ensure a proper connection.
2. Test Power Socket: Confirm that the power socket is functioning correctly by testing it with another device that works properly.
3. Replace Power Adapter: Try using a power adapter with the same specifications. If the Camera starts up normally and provides the voice prompt “Hello reoqoo” after replacement, it suggests that the original adapter may be faulty. Contact the seller for further assistance.
If the issue persists despite attempting the troubleshooting steps above, it’s likely due to equipment hardware failure. At this stage, we advise contacting our seller partner to explore the possibility of returning the product for repair. Rest assured, we’ll help you navigate this process efficiently to resolve the issue promptly with your device.
Dear reoqoo user,To ensure the intercom function of the Camera works properly, check these key settings:
1. Enable Intercom Button: Confirm that the "Intercom" button is enabled in the App.
2. Authorize Microphone Access: Grant reoqoo access to the microphone on your phone. Navigate to [Settings] → [Apps and Services] → [Permission Management] → [Microphone], find and select “reoqoo,” and allow microphone access.
Note: The operation should be similar to other mobile phone brands. If you have any questions, consult the customer service of the corresponding brand or search online for specific model tutorials.
3. Adjust Device Sound Volume: Enter the reoqoo App, go to the monitoring screen, click the “∷” icon, enter “Settings,” and adjust the device sound volume to over 80%.
If the issue persists despite attempting the troubleshooting steps above, it’s likely due to equipment hardware failure. At this stage, we advise contacting our seller partner to explore the possibility of returning the product for repair. Rest assured, we’ll help you navigate this process efficiently to resolve the issue promptly with your device.
Dear reoqoo user,To ensure standard sound output on your phone during intercom usage:
1. Enable Speaker Icon: On the camera control interface of the reoqoo App, ensure the “Speaker” icon is enabled (i.e., in the on state).
2. Adjust Phone Volume: Maximize the volume of your phone system to fully experience the audio effects.
Dear Reoqoo user,If you encounter a situation where the daytime imaging is black-and-white, you can troubleshoot it as follows:
1. Enable Day/Night Full Color Mode: Enter the Reoqoo App > Reoqoo Camera > click “∷” to enter the “Settings” interface > Imaging > Night Mode View > enable the “Day/Night Full Color” button.
Note:This method is suitable for Reoqoo Outdoor Camera.
2. Restart the Camera: If the mode is already enabled but doesn't switch to color mode in sufficient lighting conditions, try restarting the Camera and observe.
If the issue persists despite attempting the troubleshooting steps above, it’s likely due to equipment hardware failure. At this stage, we advise contacting our seller partner to explore the possibility of returning the product for repair. Rest assured, we’ll help you navigate this process efficiently to resolve the issue promptly with your device.
Dear reoqoo user,If the live broadcast imaging is blurry, try these troubleshooting steps:
1. Adjust Camera Position: Focus the Camera on objects further away and observe if clarity improves.
2. Check Resolution Setting: Ensure the resolution setting is FHD. Adjust it on the monitoring interface by selecting the “FHD” quality option.
3. Clean Lens: Clean the lens surface gently with a non-woven cloth to remove dust, which may affect image quality.
If the issue persists despite attempting the troubleshooting steps above, it’s likely due to equipment hardware failure. At this stage, we advise contacting our seller partner to explore the possibility of returning the product for repair. Rest assured, we’ll help you navigate this process efficiently to resolve the issue promptly with your device.
Dear reoqoo user,To troubleshoot a reddish monitoring screen:
1. Adjust Monitoring Angle: If the screen is partially reddish and the position is fixed, it may be due to a red light source in the monitoring range. If so, remove or ignore the source.
2. Restart the Camera: If the whole screen remains reddish, it may be caused by the IR-CUT switch failure. Unplug and replug the Camera or operate in the App. Open [reoqoo Camera], click the “::” in the upper right corner of the monitoring interface, select “Restart Camera,” and confirm the action.
If the issue persists despite attempting the troubleshooting steps above, it’s likely due to equipment hardware failure. At this stage, we advise contacting our seller partner to explore the possibility of returning the product for repair. Rest assured, we’ll help you navigate this process efficiently to resolve the issue promptly with your device.
Dear reoqoo user,To configure the AI detection function of your reoqoo Camera, follow these steps:
1. Open reoqoo App: Launch the reoqoo App on your mobile device. Navigate to [reoqoo Camera] and click “∷” to access the “Settings” menu.
In the “Settings” menu, go to [Smart Home Guarding] > [Cloud Recording] and ensure it's enabled (blue color indicates enabled).
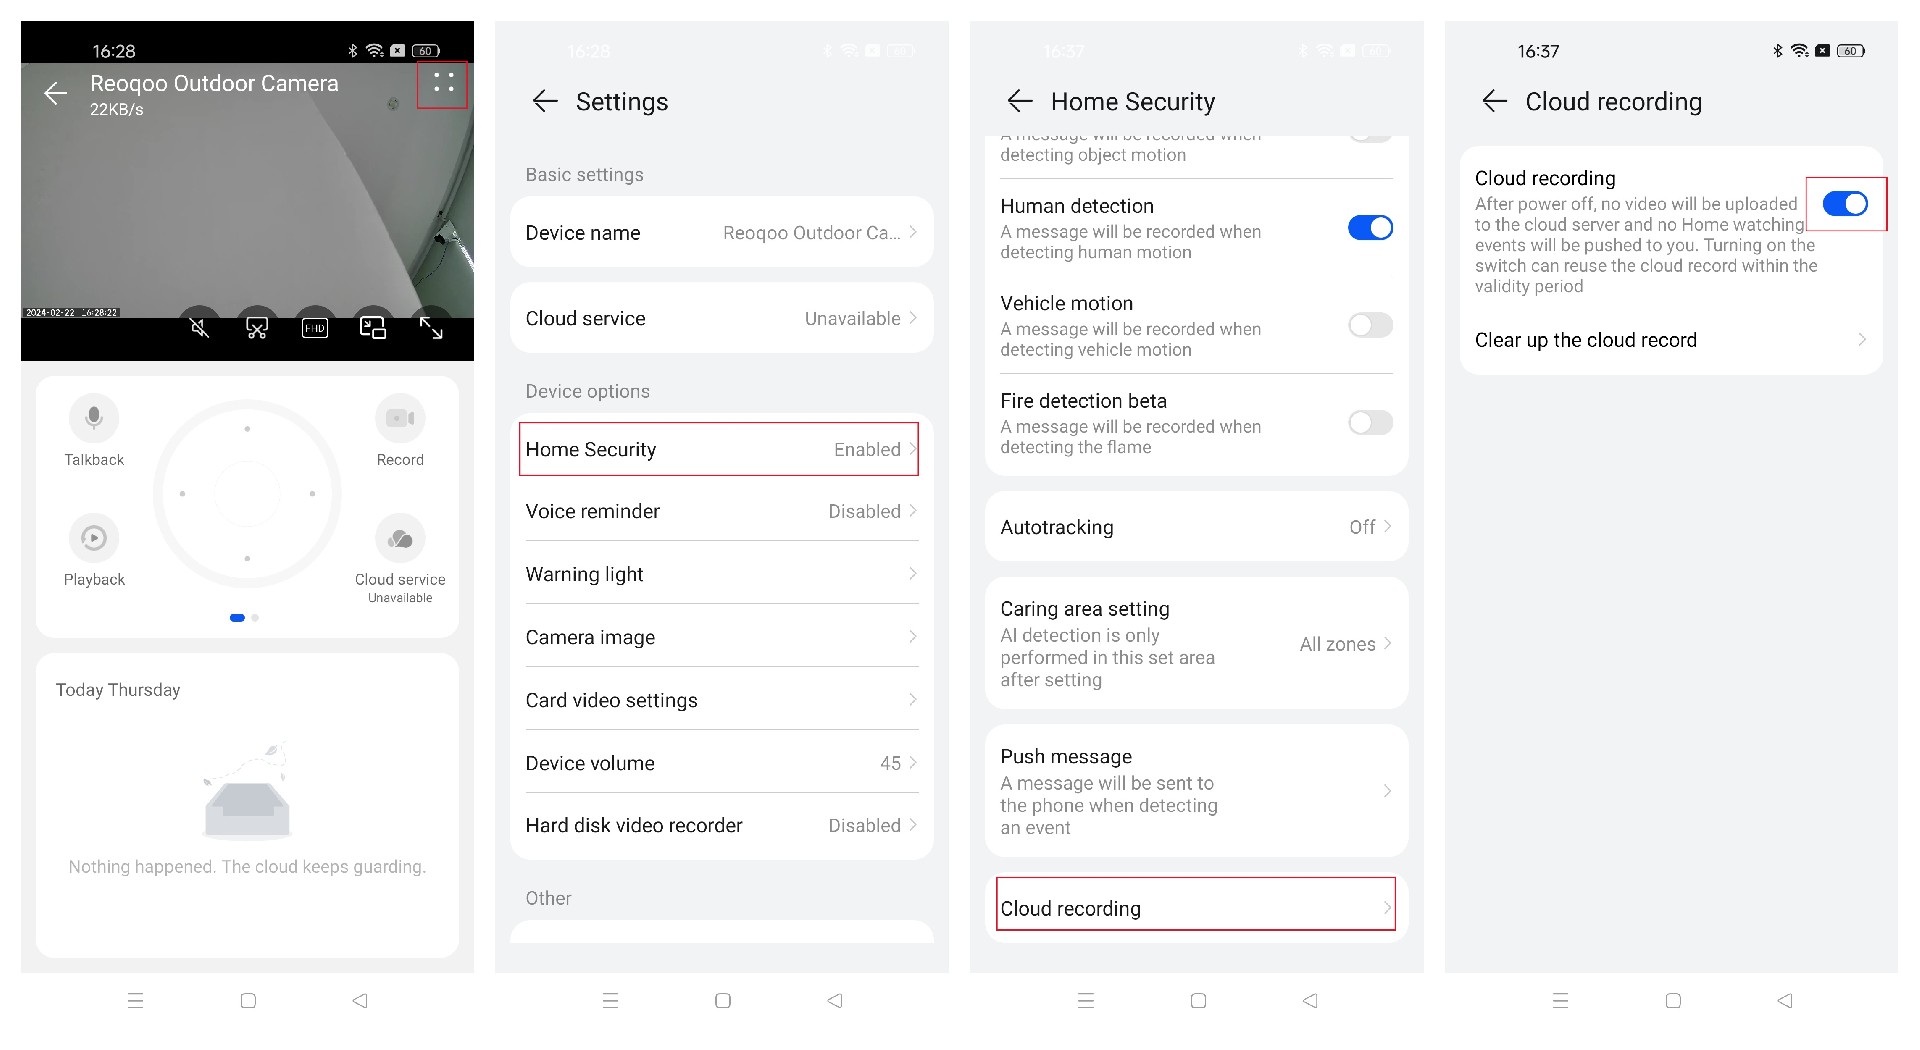
2. Enable AI Detection Functions: Within the same settings interface, enable various AI detection functions as needed, such as screen changes, human activity, or vehicle movement. Ensure that [Message Push] is enabled to receive alerts in real-time.
Tips:
• When AI detection is triggered, an 8-second video will automatically upload each time.
• Free service uploads at least once every 3 minutes, while paid service has no such restrictions and uploads immediately upon event trigger.
• Message push follows specific priority, e.g., screen changes < human activity, pet detection, etc. Events of the same priority are sorted by trigger time.
• AI detection function requires an internet connection; it cannot trigger AI detection and upload to the cloud when offline.
• [Guarding Area] and [Tracking Function] cannot be used simultaneously. When tracking, it prioritizes the tracking of objects with a larger screen share.
You can customize your home protection needs in the App, and reoqoo Camera will intelligently guard your home. Ensure that the network connection remains stable during operations. If you have any questions or need more detailed assistance, please contact us.
Dear reoqoo user,If “human activity” appears but no corresponding event record is found, follow these steps:
1. Check the AI detection Function: Open the reoqoo App, enter the [reoqoo Camera] settings interface (click the upper right “∷”), and ensure that functions such as “human activity” in [Smart Home Guarding] are enabled.
2. Confirm the Cloud Recording Status: Check if [Cloud Recording] is enabled in the same settings interface (the button is blue).
3. Adjust the Guarding Area: Correctly set the [Guarding Area] to limit the detection range if needed. If there are errors, refer to the relevant illustrations for correction.
4. Restart the Camera: Scroll down in the device settings interface to find and click [Restart Camera]. After the device restarts, observe if the function returns to normal.
If “human activity” exists, but the Camera still fails to generate records after being restarted, please provide feedback to us in the following manner:
• Record a Test Video: When there is an activity under the Camera, use the App to monitor the screen in real-time and click the record icon to record a video for about 6 seconds.
• Provide Device ID: Enter the [reoqoo Camera] settings interface, find [Device Information], copy all information, and send it via email to support@reoqoo.com.
If the issue is temporarily resolved after a restart but reoccurs later, repeat the feedback steps above, and we will address it promptly.
Dear reoqoo user,To ensure timely message push from reoqoo Camera, please operate by following these simple steps:
1. Enable Notification Alert: Enter your reoqoo App, go to the [reoqoo Camera] interface, click the upper right “∷” icon to enter [Smart Home Guarding] settings, and enable notification alerts for corresponding events as needed.
2. Allow Notifications: Find the [Notification and Status Bar] section in the phone’s [Settings] menu (some phones may be displayed as [Notification Center]). Search for “reoqoo” and open “Allow Notifications”
3. Check No-Bother Mode: Pull down the notification bar at the top of the phone's screen to check if the no-bother mode is enabled. For example, when the No-bother mode is active on an iPhone, a moon symbol will appear in the notification bar. If the No-bother mode is on, disable it to restore normal notifications.
Dear reoqoo user, if the issue persists after attempting the steps mentioned above, don’t worry. We understand your frustration and are here to help. To better assist you, please click on the problem feedback and provide the following:
1. A detailed description of the issue.
2. Video or screenshot evidence of the device malfunction.
Upon receipt, we’ll promptly investigate and address your concern and ensure a swift resolution.
Dear reoqoo user,If your reoqoo Camera consistently prompts “Human activity” despite no one being in the monitoring range, follow these steps to troubleshoot:
1. Enable Human Detection Feature:Open the reoqoo App. Enter your reoqoo Camera interface. Click the "∷" icon in the upper right corner to access the "Settings" menu. Find and enable the [Human Detection] feature in the imaging settings area. View the video clips labeled "Human Activity" in the reoqoo App. Observe what specific objects are being marked as human activity. Remove or adjust objects within the monitoring range that may trigger false markings if possible.
Note:This method is suitable for reoqoo Outdoor Camera.
2. Look for items such as clothing or toys within the monitoring range. These items may inadvertently trigger the human detection feature. If found, try to move them out of the monitoring range and observe if the false alarms persist. By following these steps, you can troubleshoot and mitigate inaccurate reporting of human activities in your reoqoo Camera, ensuring more reliable monitoring and alerts.
If the issue persists despite attempting the troubleshooting steps above, it’s likely due to equipment hardware failure. At this stage, we advise contacting our seller partner to explore the possibility of returning the product for repair. Rest assured, we’ll help you navigate this process efficiently to resolve the issue promptly with your device.
Dear reoqoo user,reoqoo Camera offers voice alert functionality to notify you when it detects someone passing by or a vehicle moving within the set range. You can personalize voice reminders through the reoqoo App to easily deter unknown visitors. Follow these steps to enable voice alerts:
Access Settings: Open the reoqoo App. Navigate to the settings for your reoqoo Camera by clicking on it. Click on the “∷” icon to access the detailed settings within the camera settings interface. Look for the option related to voice alerts and enable it.
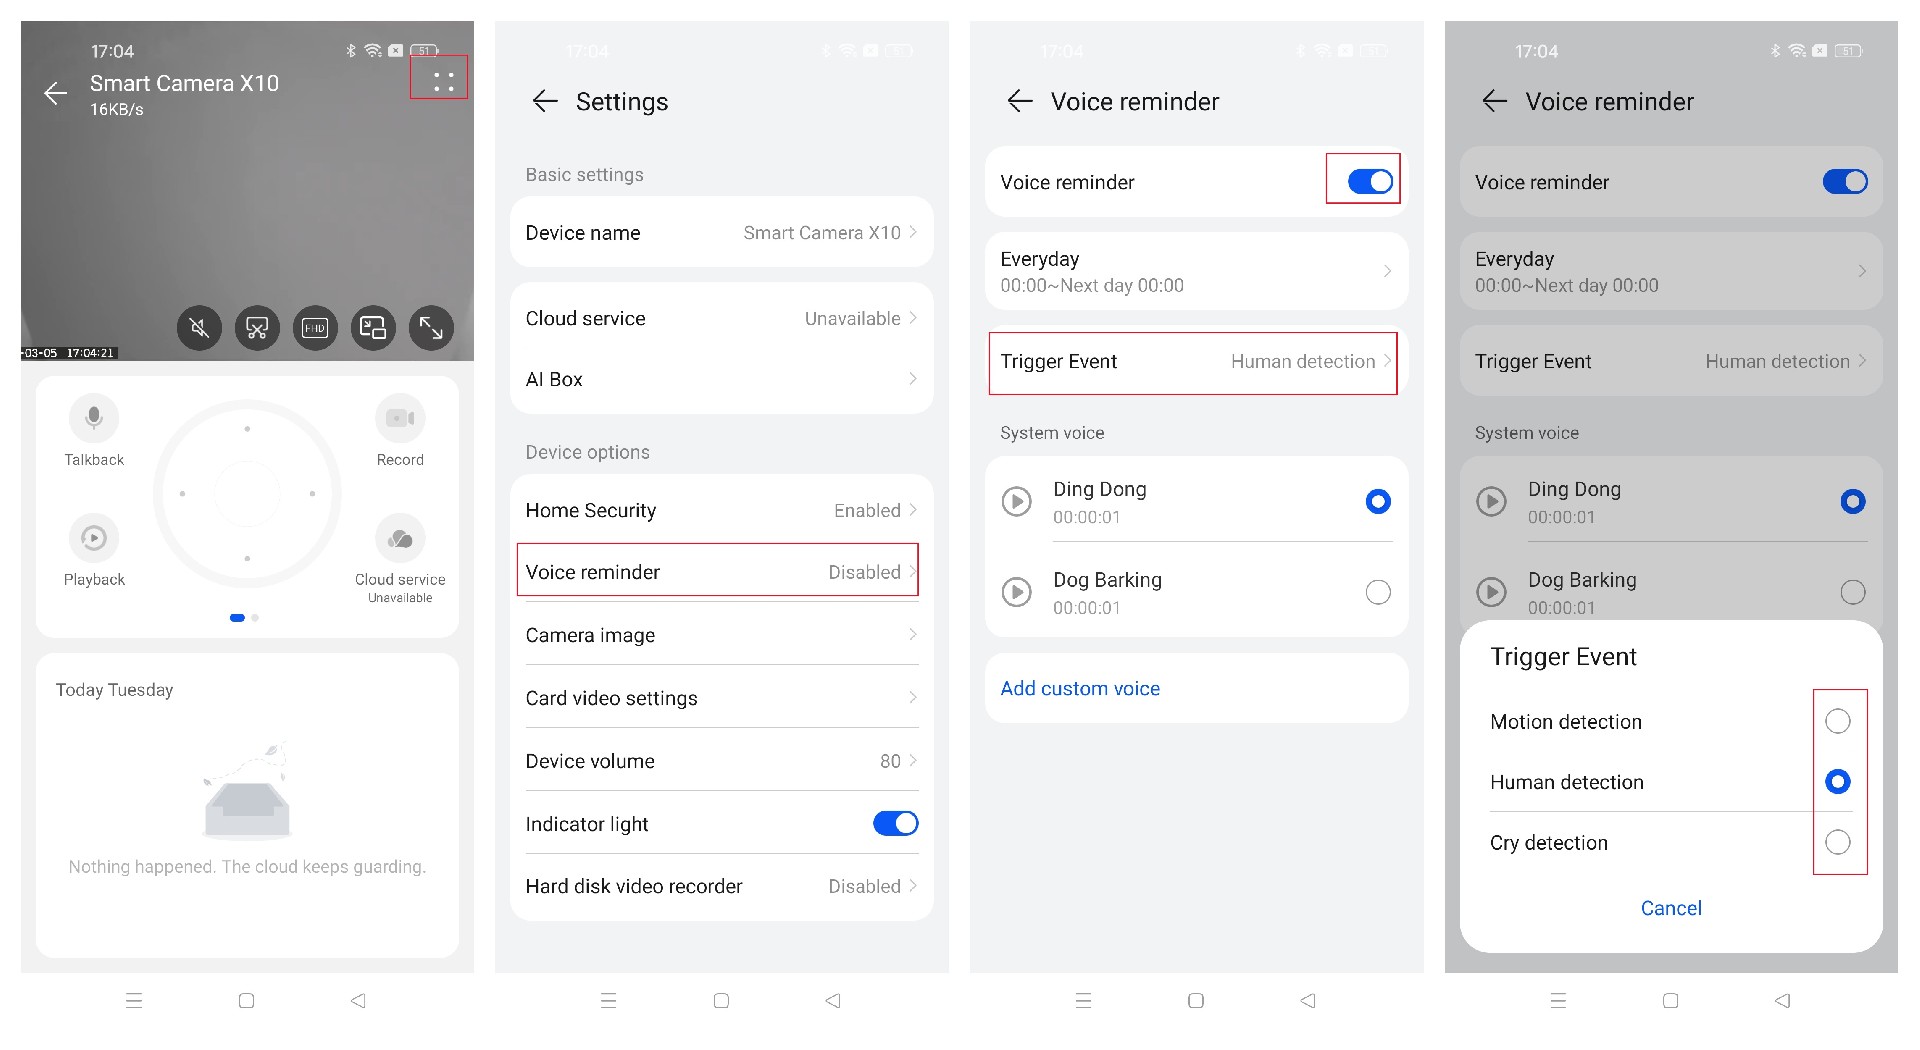
•Customize different voices for different scenarios if desired.
• Note that only one type of event can be enabled for voice alerts at a time. For example, setting it for “Human Activity” will only sound an alert when human movement is detected.
Dear reoqoo user,The AI Toolbox feature of the reoqoo Camera expands its capabilities beyond ordinary monitoring. With powerful parallel compatibility, it expands multiple AI algorithms for cameras, allowing you to customize your monitoring scenes within the App.
There are scene categories for monitoring babies, pets, home security, store monitoring, and warehouse monitoring. You can choose different AI-monitoring event scenes based on different installation environments.
Operation Method: Enter the reoqoo App > reoqoo Camera > Click “∷” to enter the “Settings” interface > AI Toolbox, and enable the corresponding feature buttons based on personal needs for scene changes.
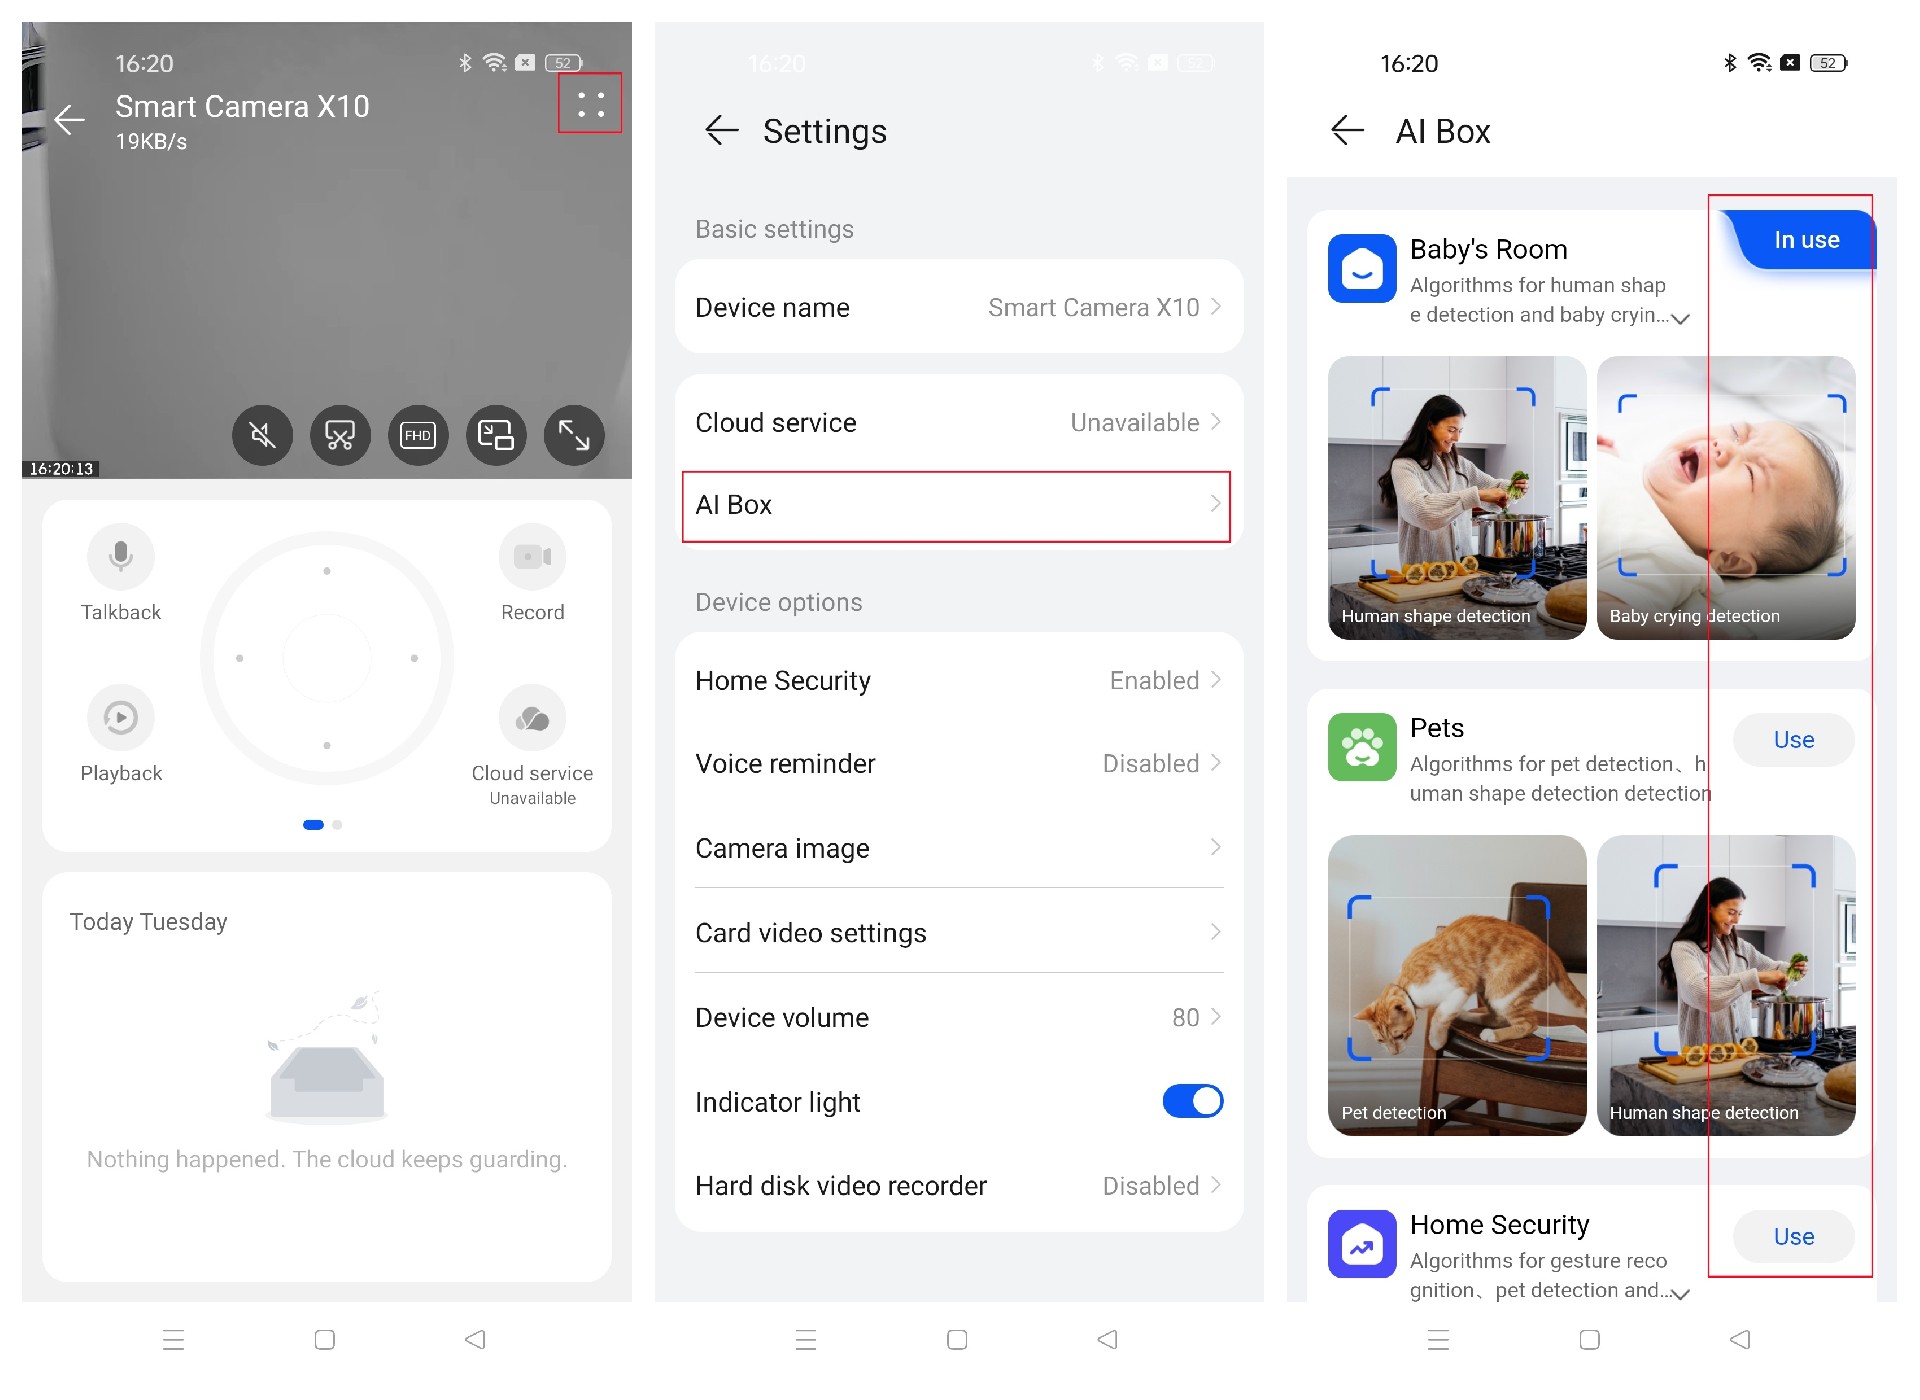
Note: After a device reset, the AI Toolbox will reset to the default baby monitoring scene.
Dear reoqoo user,The reoqoo Camera supports gesture control for quick operations. The device supports “OK” and “Palm” gestures. Once the function is enabled, the device will perform quick operations when it detects the corresponding gesture. Here's how to set it up:
1. Access Gesture Control Settings: Enter the reoqoo App > reoqoo Camera > Click “∷” to enter the “Settings” interface > AI Toolbox > Switch to the “Home Guarding” scene.
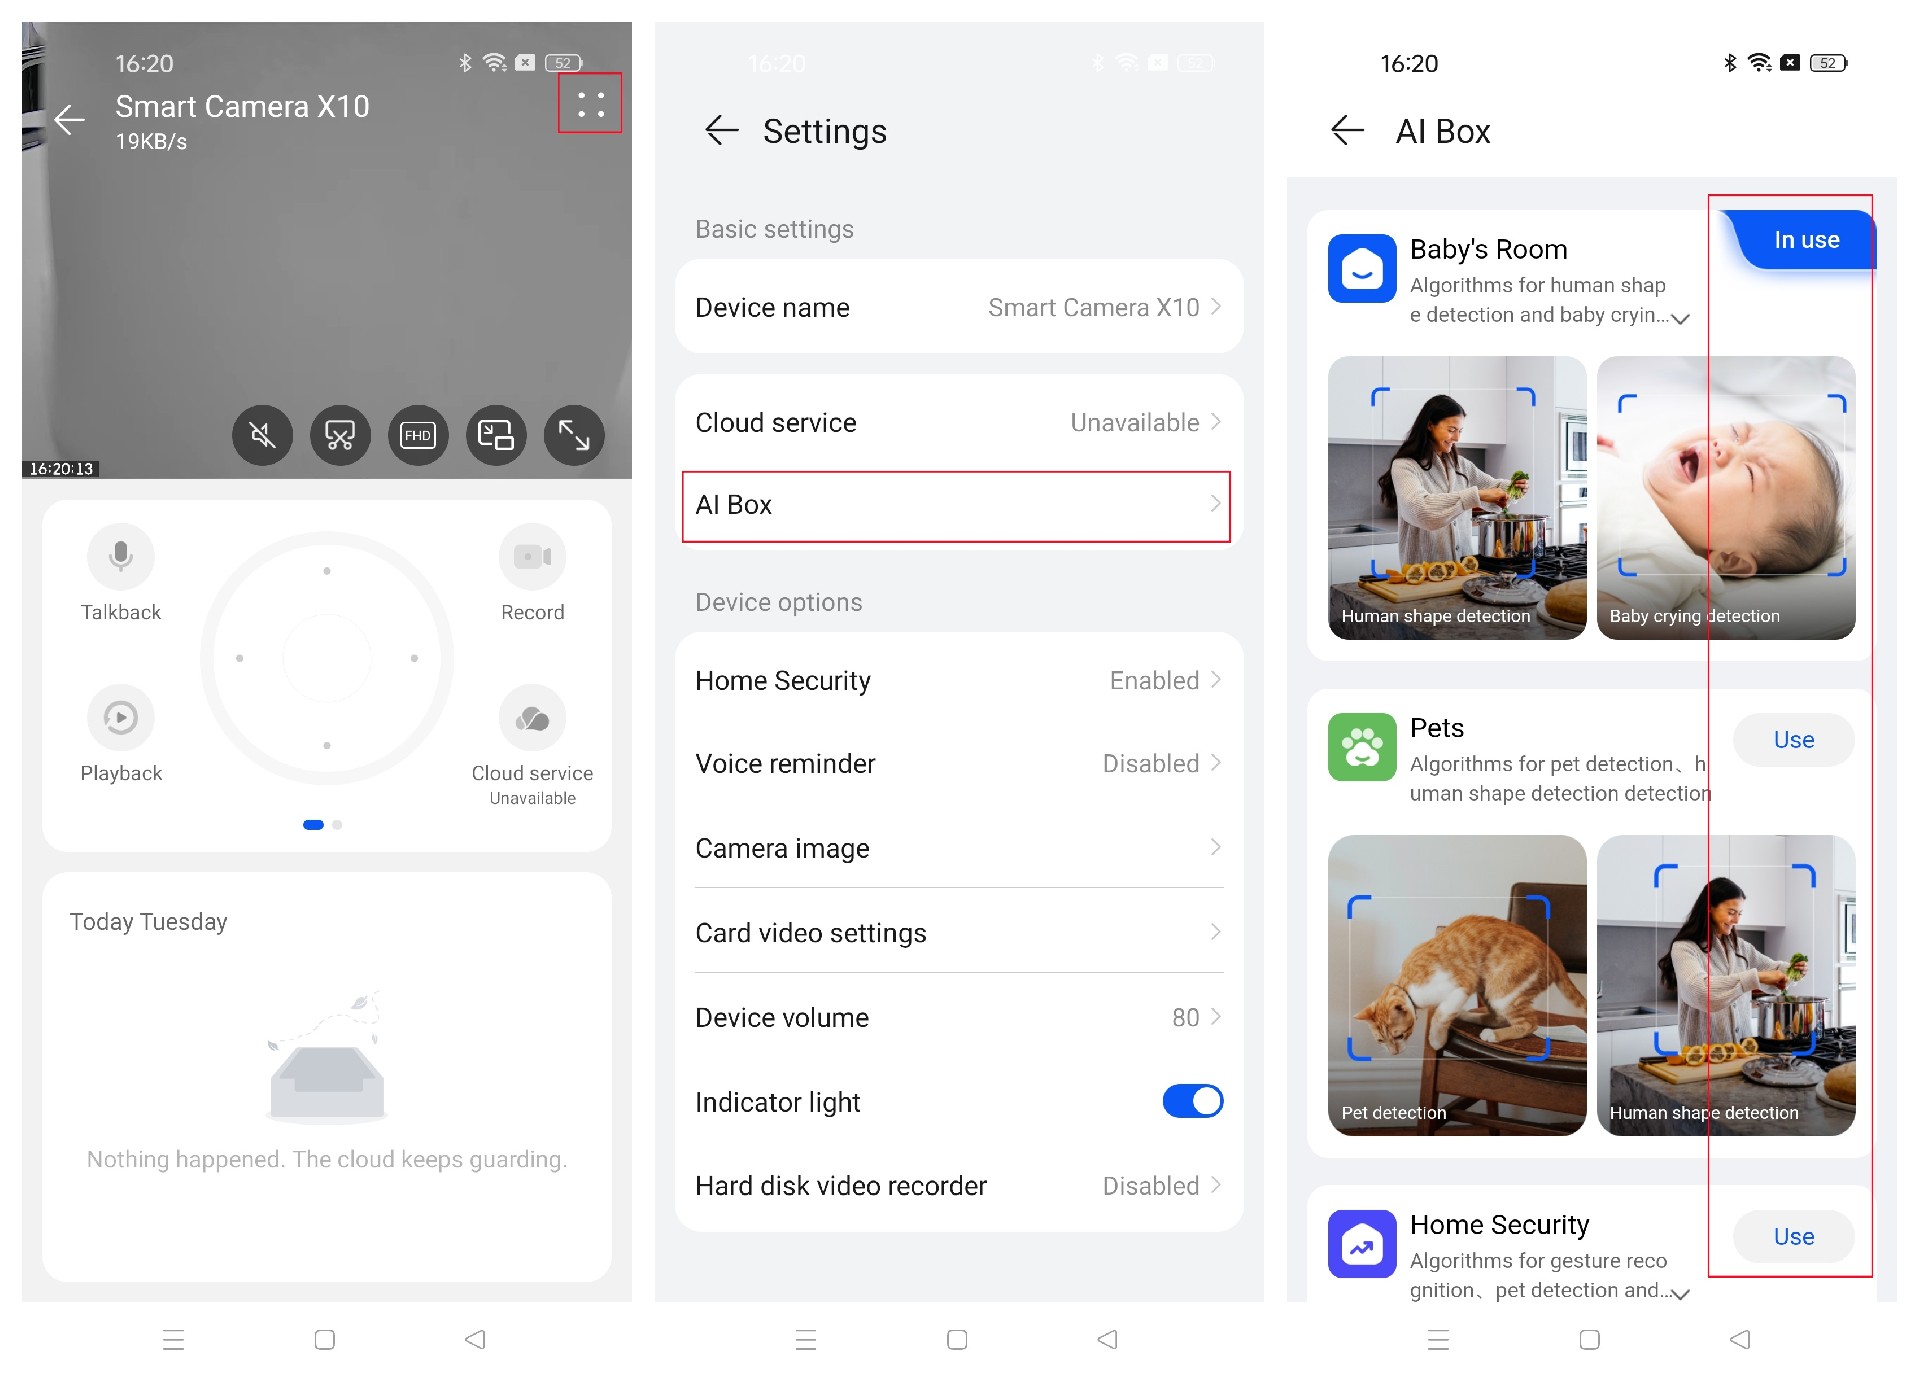
2. Enable Gesture Control: Enter the reoqoo App > reoqoo Camera > Click “∷” to enter the “Settings” interface > Gesture Control > Enable gesture control.
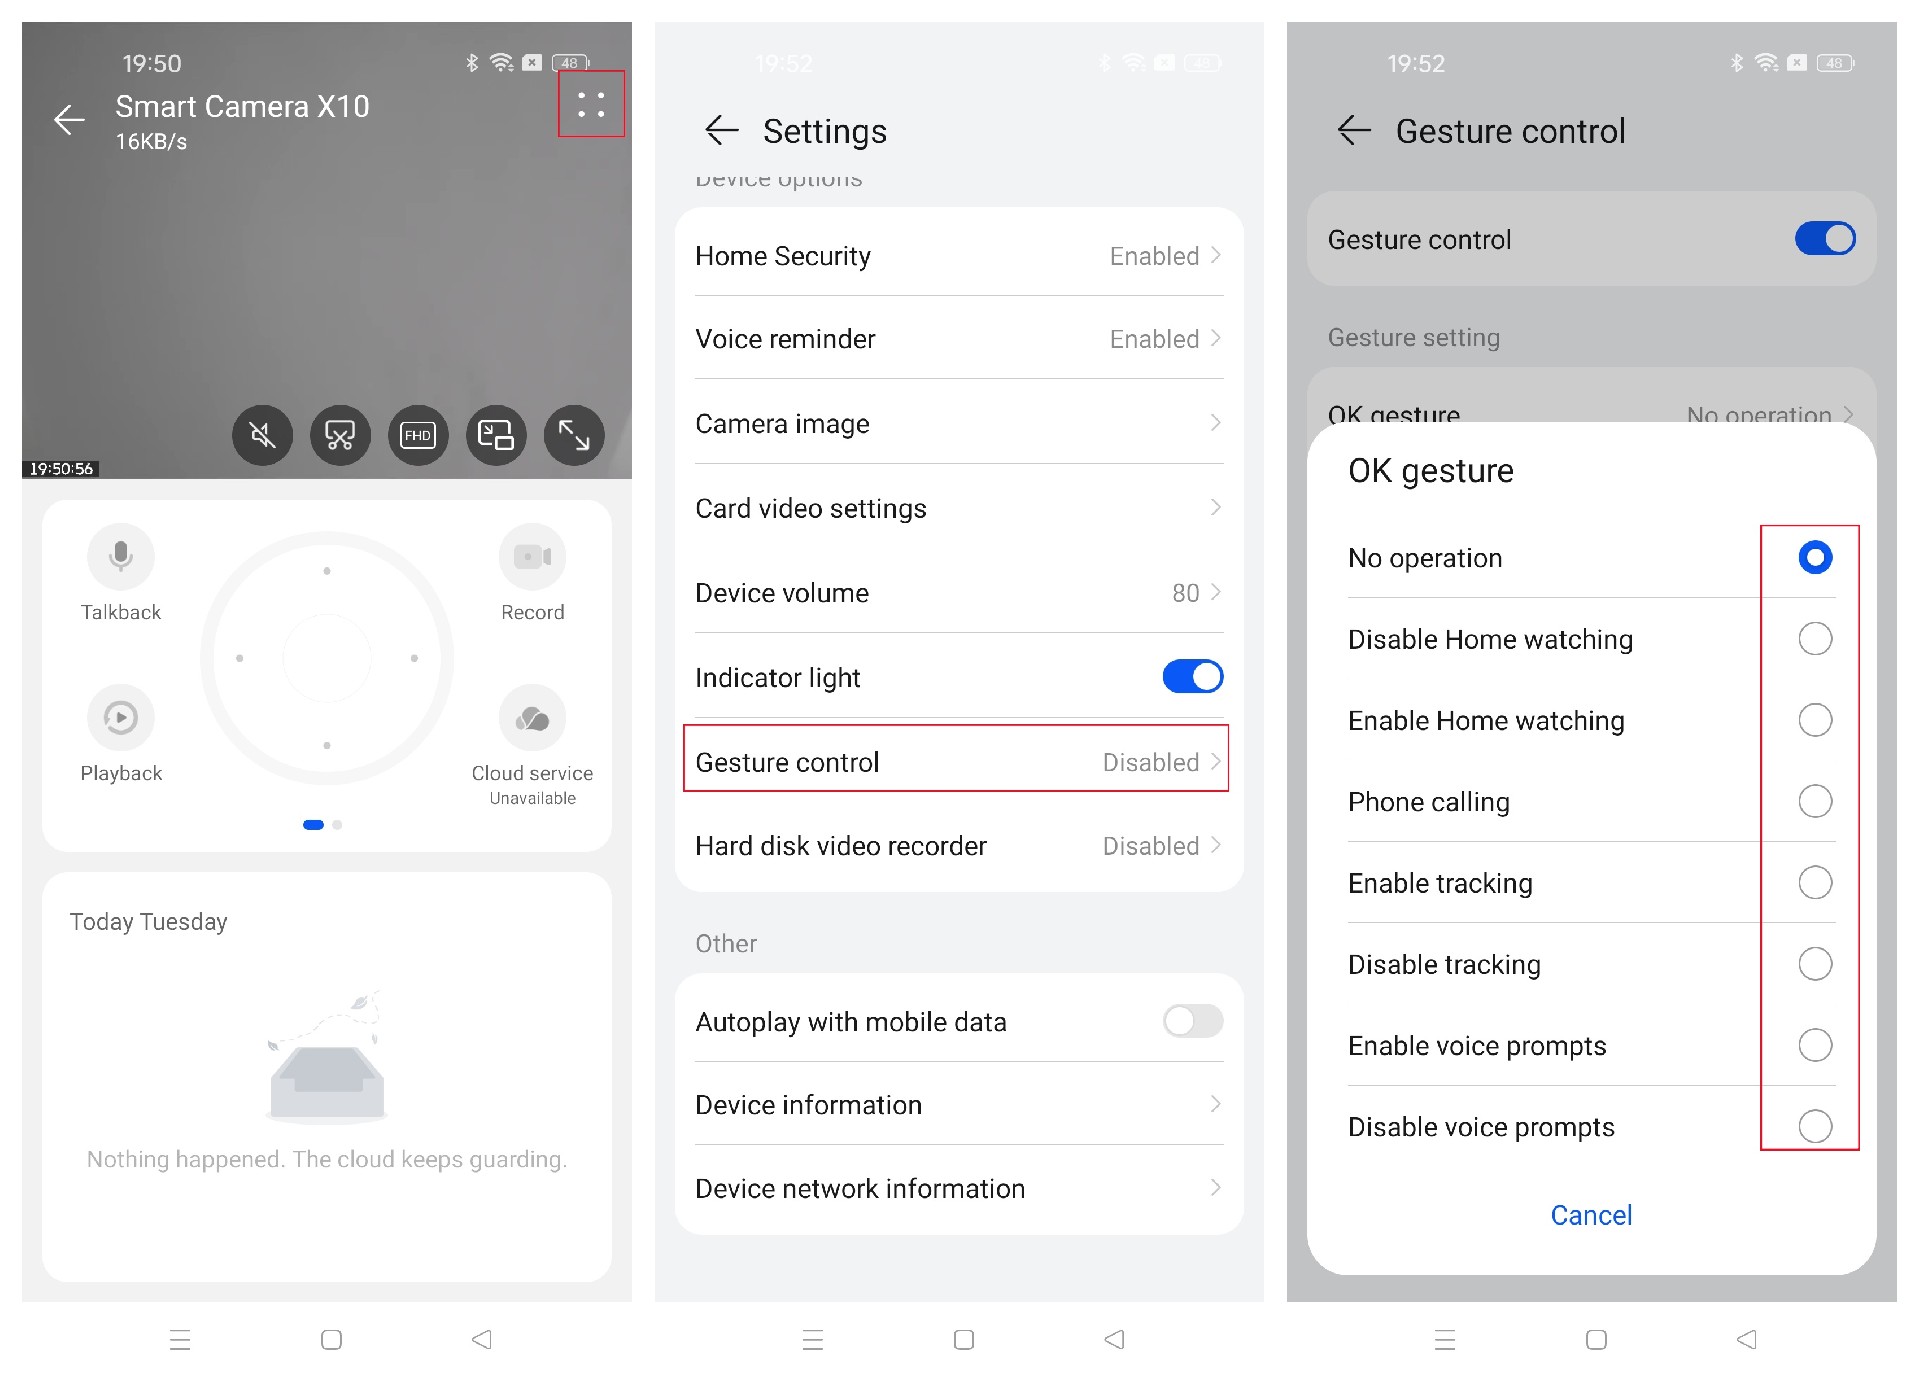
Note: For switch-type control commands, there is a 10-second interval between executing the same gesture, and gesture control does not respond during a device call.
Dear reoqoo user,When encountering incomplete card playback video on the reoqoo Camera, consider the following possible reasons and solutions:
1. Power Supply Issue: An unstable power supply to the device is a common cause of interrupted recordings. This can be due to power outages or faults in the Camera itself or its accessories (such as power adapters or cables), which causes sudden blackouts or restarts. It is recommended that a reliable new power adapter and cable be used to ensure the Camera receives a stable power supply.
2. Memory Card Failure: If the memory card used for recording exhibits abnormal behavior or is damaged, it can result in incomplete recordings. The issue lies with the memory card, and it is recommended that it be replaced with a new Micro SD card purchased from a reputable source for reliable quality.
Dear reoqoo user, if the issue persists after attempting the steps mentioned above, don’t worry. We understand your frustration and are here to help. To better assist you, please click on the problem feedback and provide the following:
1. A detailed description of the issue.
2. Video or screenshot evidence of the device malfunction.
Upon receipt, we’ll promptly investigate and address your concern and ensure a swift resolution.
Dear reoqoo user,If there is no content in the local video after inserting a Micro SD card into the reoqoo Camera, follow these steps:
1. Activate Local Storage: Open the reoqoo App, enter the outdoor camera settings (click the small “∷” icon), enter “Card Recording Settings,” and ensure “Local Recording” is enabled (the button is blue).
2. Check and Format the SD Card: Confirm that the Micro SD card meets the requirements (Fat32 or exFat format, at least Class 10 speed rating, maximum capacity of 256GB). Try formatting it within the App. If formatting within the App is unsuccessful, remove the card, connect it to a computer, and format it using the 'exFat' file system.
3. Data Security Reminder: Formatting will erase all data, so please backup important recordings before proceeding.
4. Troubleshoot SD Card Issues: If the problem persists after formatting, it may be due to issues with the SD card. In this case, replace it with a new Micro SD card purchased from a reputable source.
Dear reoqoo user, if the issue persists after attempting the steps mentioned above, don’t worry. We understand your frustration and are here to help. To better assist you, please click on the problem feedback and provide the following:
1. A detailed description of the issue.
2. Video or screenshot evidence of the device malfunction.
Upon receipt, we’ll promptly investigate and address your concern and ensure a swift resolution.
Dear reoqoo user,If the “Formatting failed” prompt appears, please operate according to the following steps:
1. Format on Computer:
• Unplug the Micro SD card and format it to exFAT on your computer. Ensure the SD card meets the requirements (Fat32 or exFAT format, Class 10 or above, maximum capacity 256GB).
• Note: Formatting will erase all data. Back up important videos before formatting.
2. Replace the SD Card:
• If the issue persists, consider replacing the SD card with a new one and format it again following the above steps before use.
Dear reoqoo user, if the issue persists after attempting the steps mentioned above, don’t worry. We understand your frustration and are here to help. To better assist you, please click on the problem feedback and provide the following:
1. A detailed description of the issue.
2. Video or screenshot evidence of the device malfunction.
Upon receipt, we’ll promptly investigate and address your concern and ensure a swift resolution.
Dear reoqoo user,To connect and use a DVR for monitoring using the reoqoo Camera, follow these steps:
App Operation: Open reoqoo App > reoqoo Camera> Click “∷” to enter the “Settings” > turn on the DVR, and set a password according to the on-screen instructions.
DVR Operation:
1. Ensure the power supply for the DVR is connected and working properly.
2. Open the NVR, go to the preview page, and click the “+” sign to add a device.
3. Set the following information as prompted:
• IP channel address: (the IP address of the device)
• Protocol: ONVIF
• Port: 5000: (the IP address of the device).
4. Enter the corresponding username and password, then click to confirm the connection. (The username is the ID number of your device)
Notes:
1. If there is no video, restart the NVR.
2. The NVR and Camera need to be connected to the same router and in the same network segment. Do not directly connect the Camera and NVR with an Ethernet cable.
3. Ensure the camera encoding is H.265. If connecting to an NVR, ensure the NVR supports H.265 encoding.
Dear reoqoo user,When successfully connected to the reoqoo camera on your phone, the card recording function is enabled by default. As long as a Micro SD card is inserted, the Camera can record normally regardless of internet connection. Even if the network is suddenly disconnected, the recording will continue as long as there is no power outage.
In the event of network interruption, although remote viewing of recordings through the reoqoo App is not possible, you can remove the Micro SD card, use a card reader to connect it to a computer, and view the stored local recordings with an MP4 player. When the network is restored, recordings taken during the offline period can also be viewed on the reoqoo App.
Note:
1. Newly inserted SD cards should be formatted in exFAT format before use, which can be done in the App or on a computer. In the App: open reoqoo App > Outdoor Camera interface > click “∷” to enter Settings > Card Recording Settings > Formatting > Confirm.
2. Offline recording is an emergency feature and is not suitable for long-term use.
Dear reoqoo user,
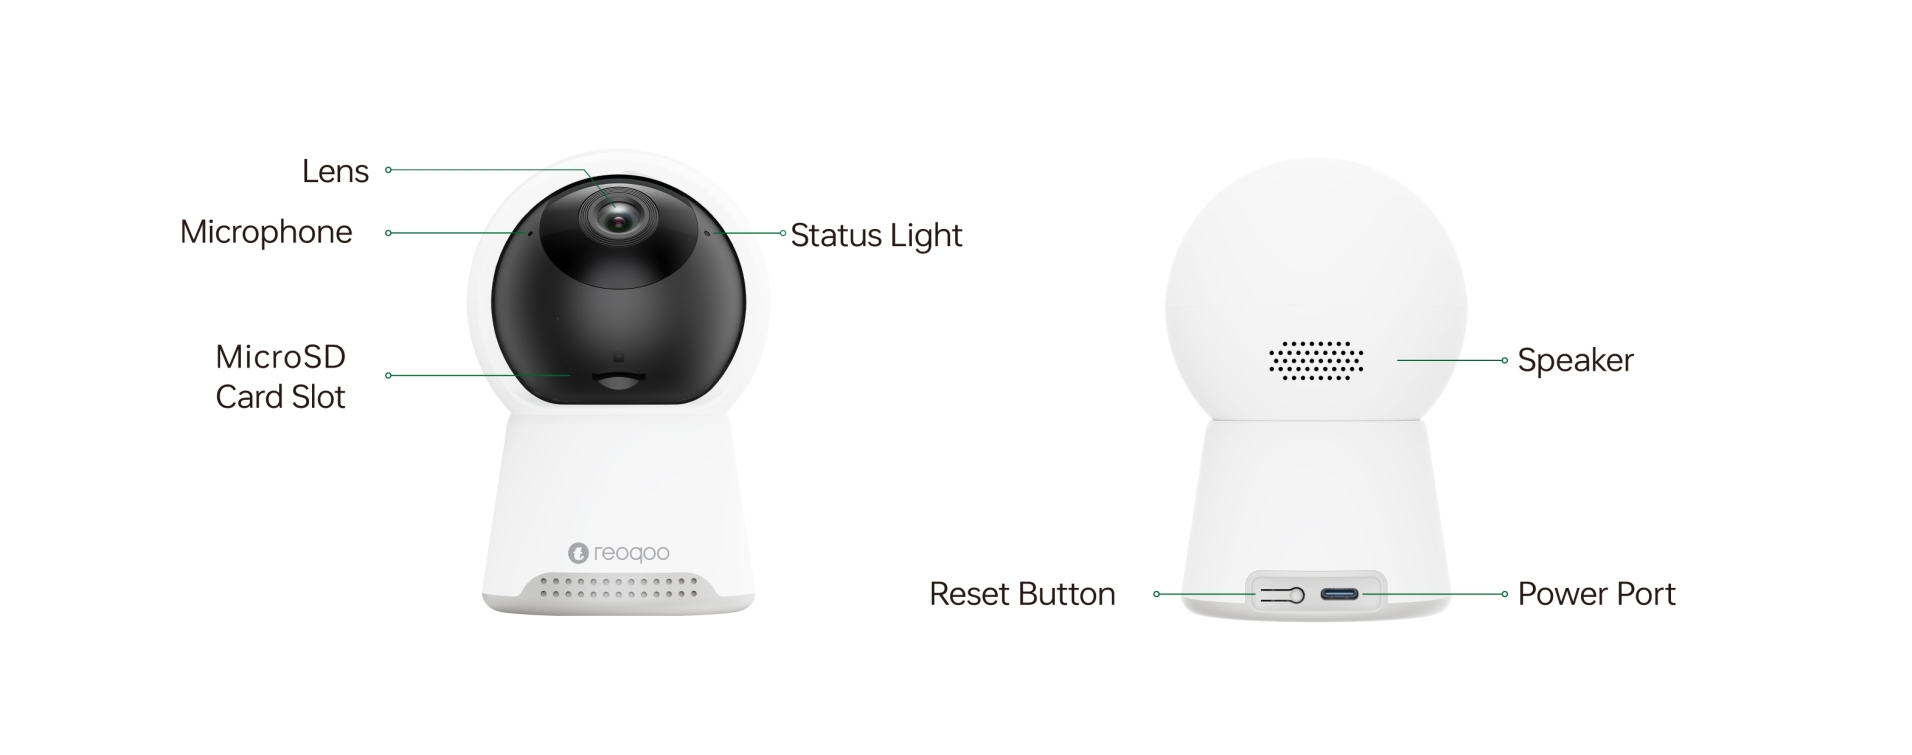
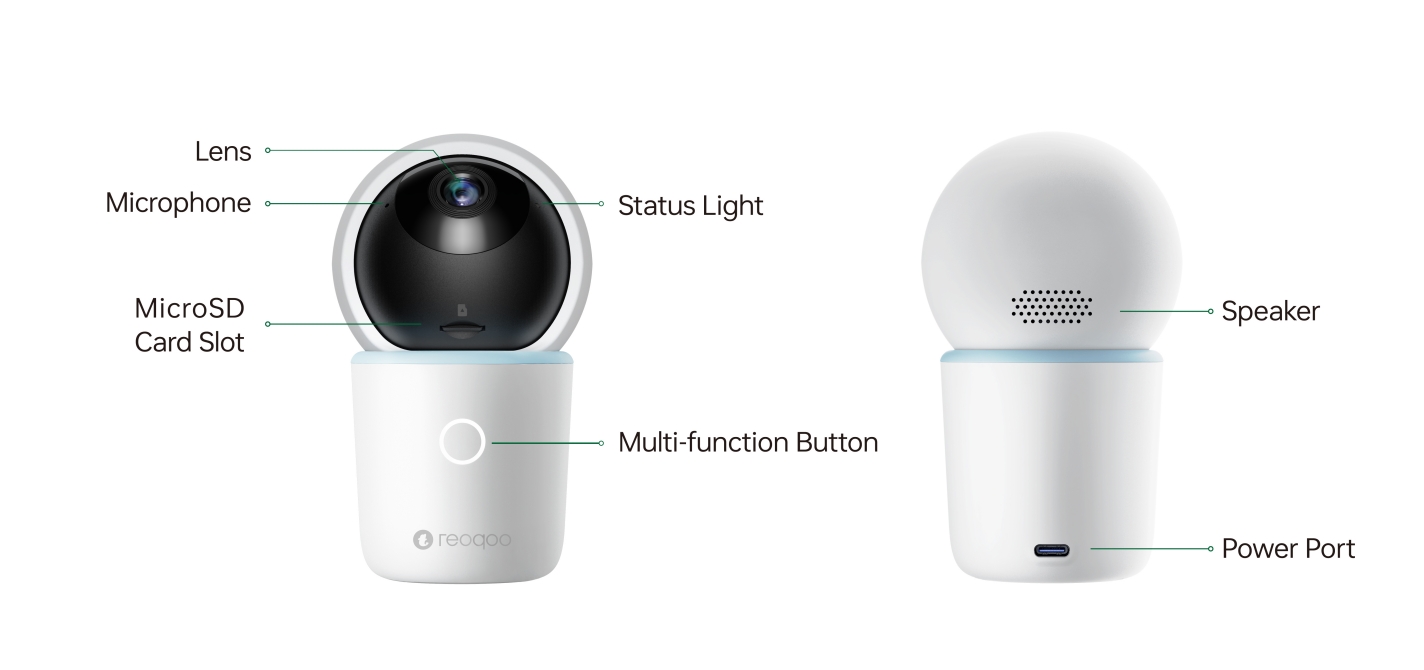
reoqoo Outdoor Camera Location: The card slot is located on the back of the Camera. Simply remove the waterproof silicone cover to access it.
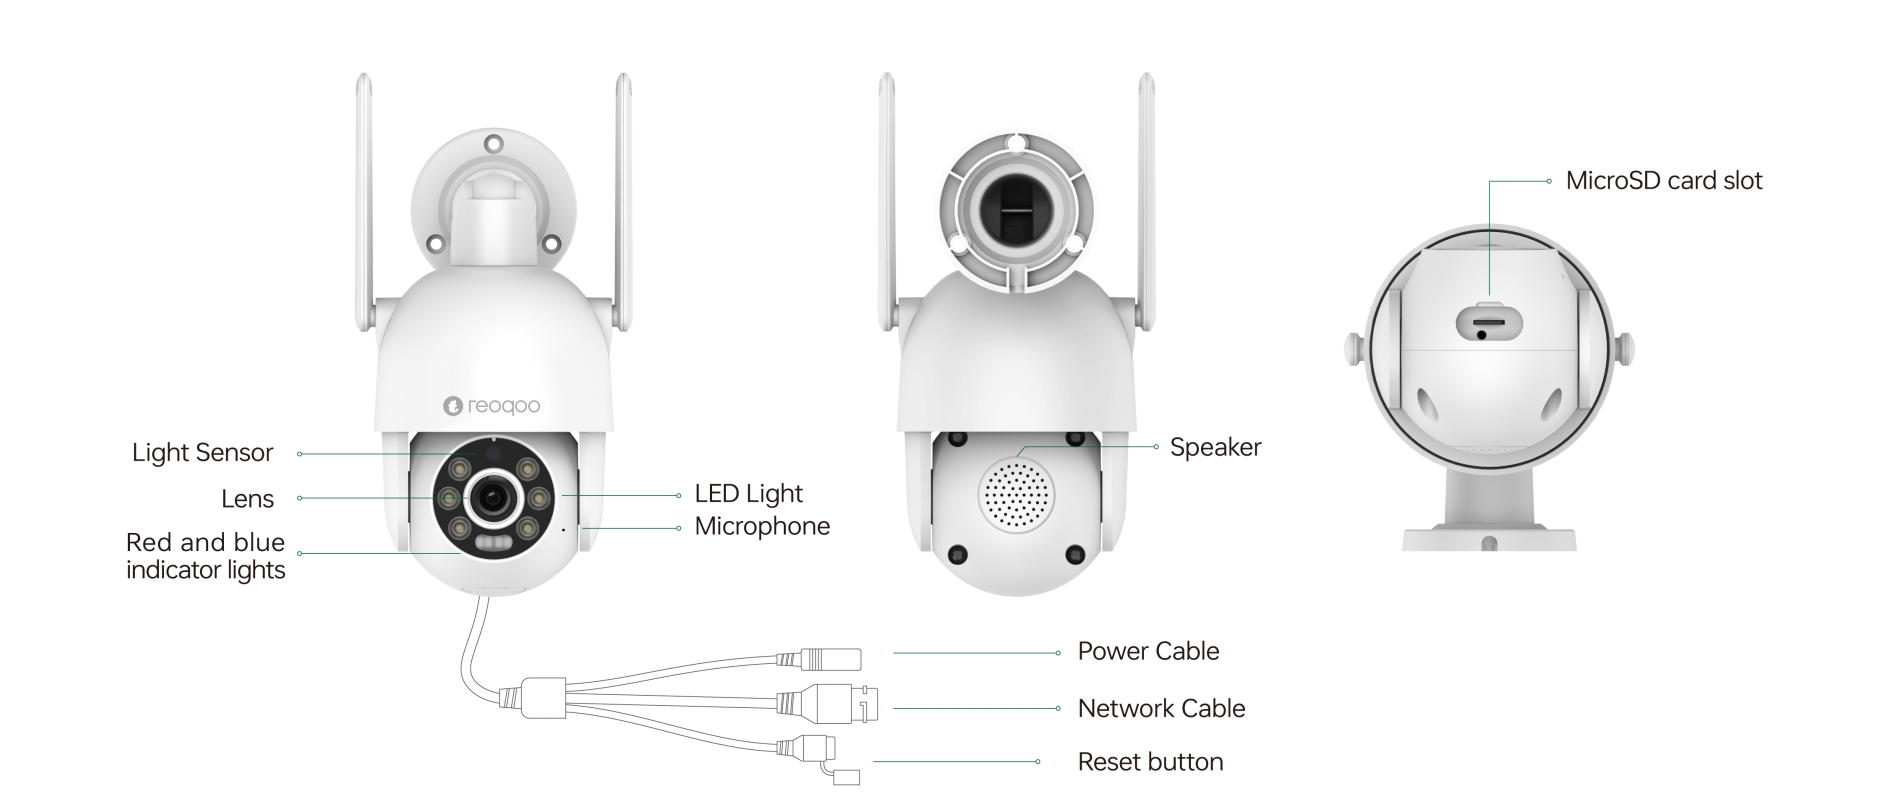
Smart Camera Location: The card slot is located at the bottom of the Camera. Move the lens upwards to see it. (It is recommended to connect to the reoqoo App and use the pan-tilt button on the App to adjust the lens upwards)
Dear reoqoo user,Description of Outdoor Camera video storage mode:
Cloud Storage Solution: Camera recordings can be uploaded to the cloud for convenient viewing through the App. There are two modes available: 24/7 recording and motion-triggered recording. After purchasing cloud services, you can view uploaded recordings within approximately 1 minute.
There is also a free dynamic cloud storage benefit, where the Camera automatically saves short videos up to 8 seconds when activity is detected. These videos are valid for 24 hours and then converted to images and stored for six days.
Card Storage Solution: Simply insert a Micro SD card (recommended Class 10 or above, maximum support 256GB, formatted as exFAT or Fat32), and the Camera will automatically start local recording storage. Remember to format the card when inserting it for the first time. You can format the card using either the mobile App or a computer, but choose the exFAT format when formatting on a computer.
Note: New recordings will overwrite the oldest ones when the SD card space is under 300 MB. Due to continuous writing, the lifespan of an SD card is limited, so choose a high-quality brand product and regularly back up important recording data.
Dear reoqoo user,The mode of operation is as follows:
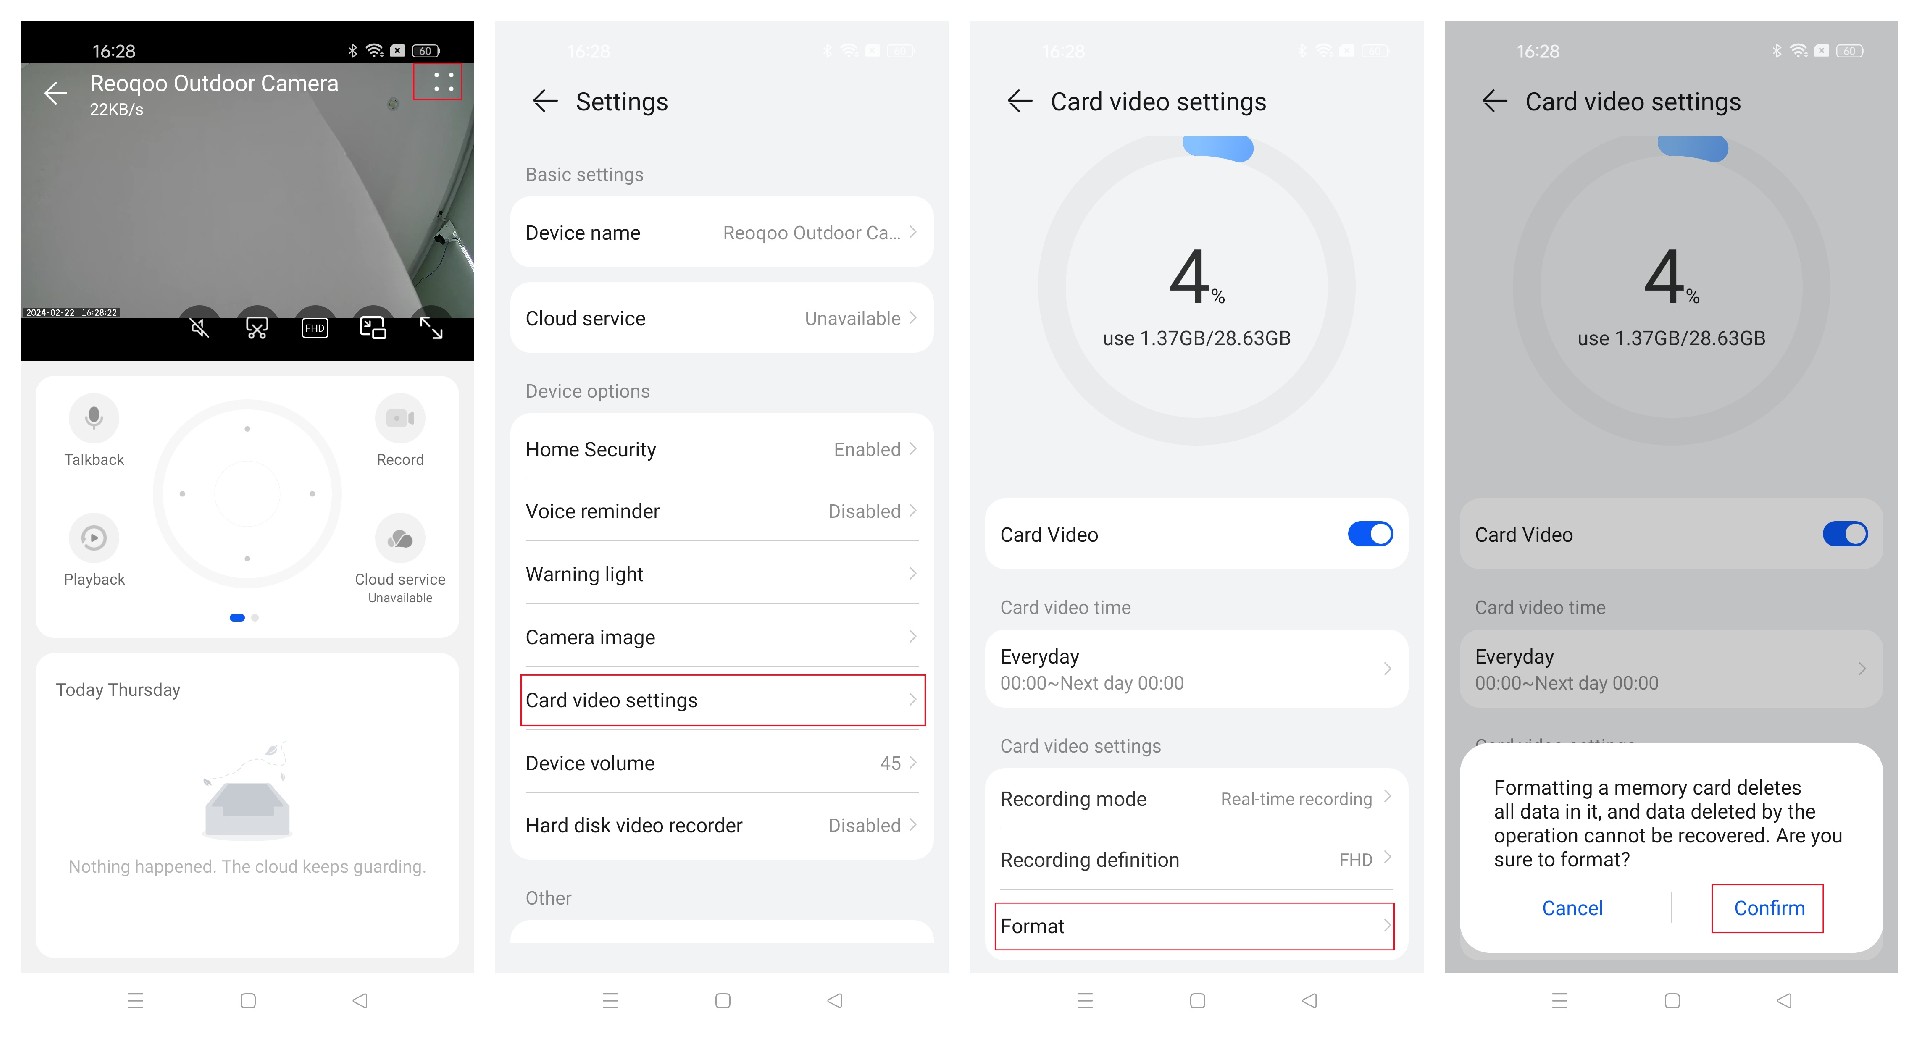
1.Card Video Recording:
Method 1: Enter the reoqoo App > reoqoo Camera > Click “∷” to enter the “Settings” interface > Card Recording Settings > Format > Confirm.
Method 2: Insert the Micro SD card into a card reader on a computer and delete videos as needed.
Note: Formatting will erase all information on the card. If important recordings are on the Micro SD card, copy and save the files before formatting.
2.Cloud Playback:
Method 1: To clear all records, enter the reoqoo App > reoqoo Camera > Click “∷” to enter the “Settings” interface > Open Smart Home Guarding > Cloud Records > Clear Cloud Records.
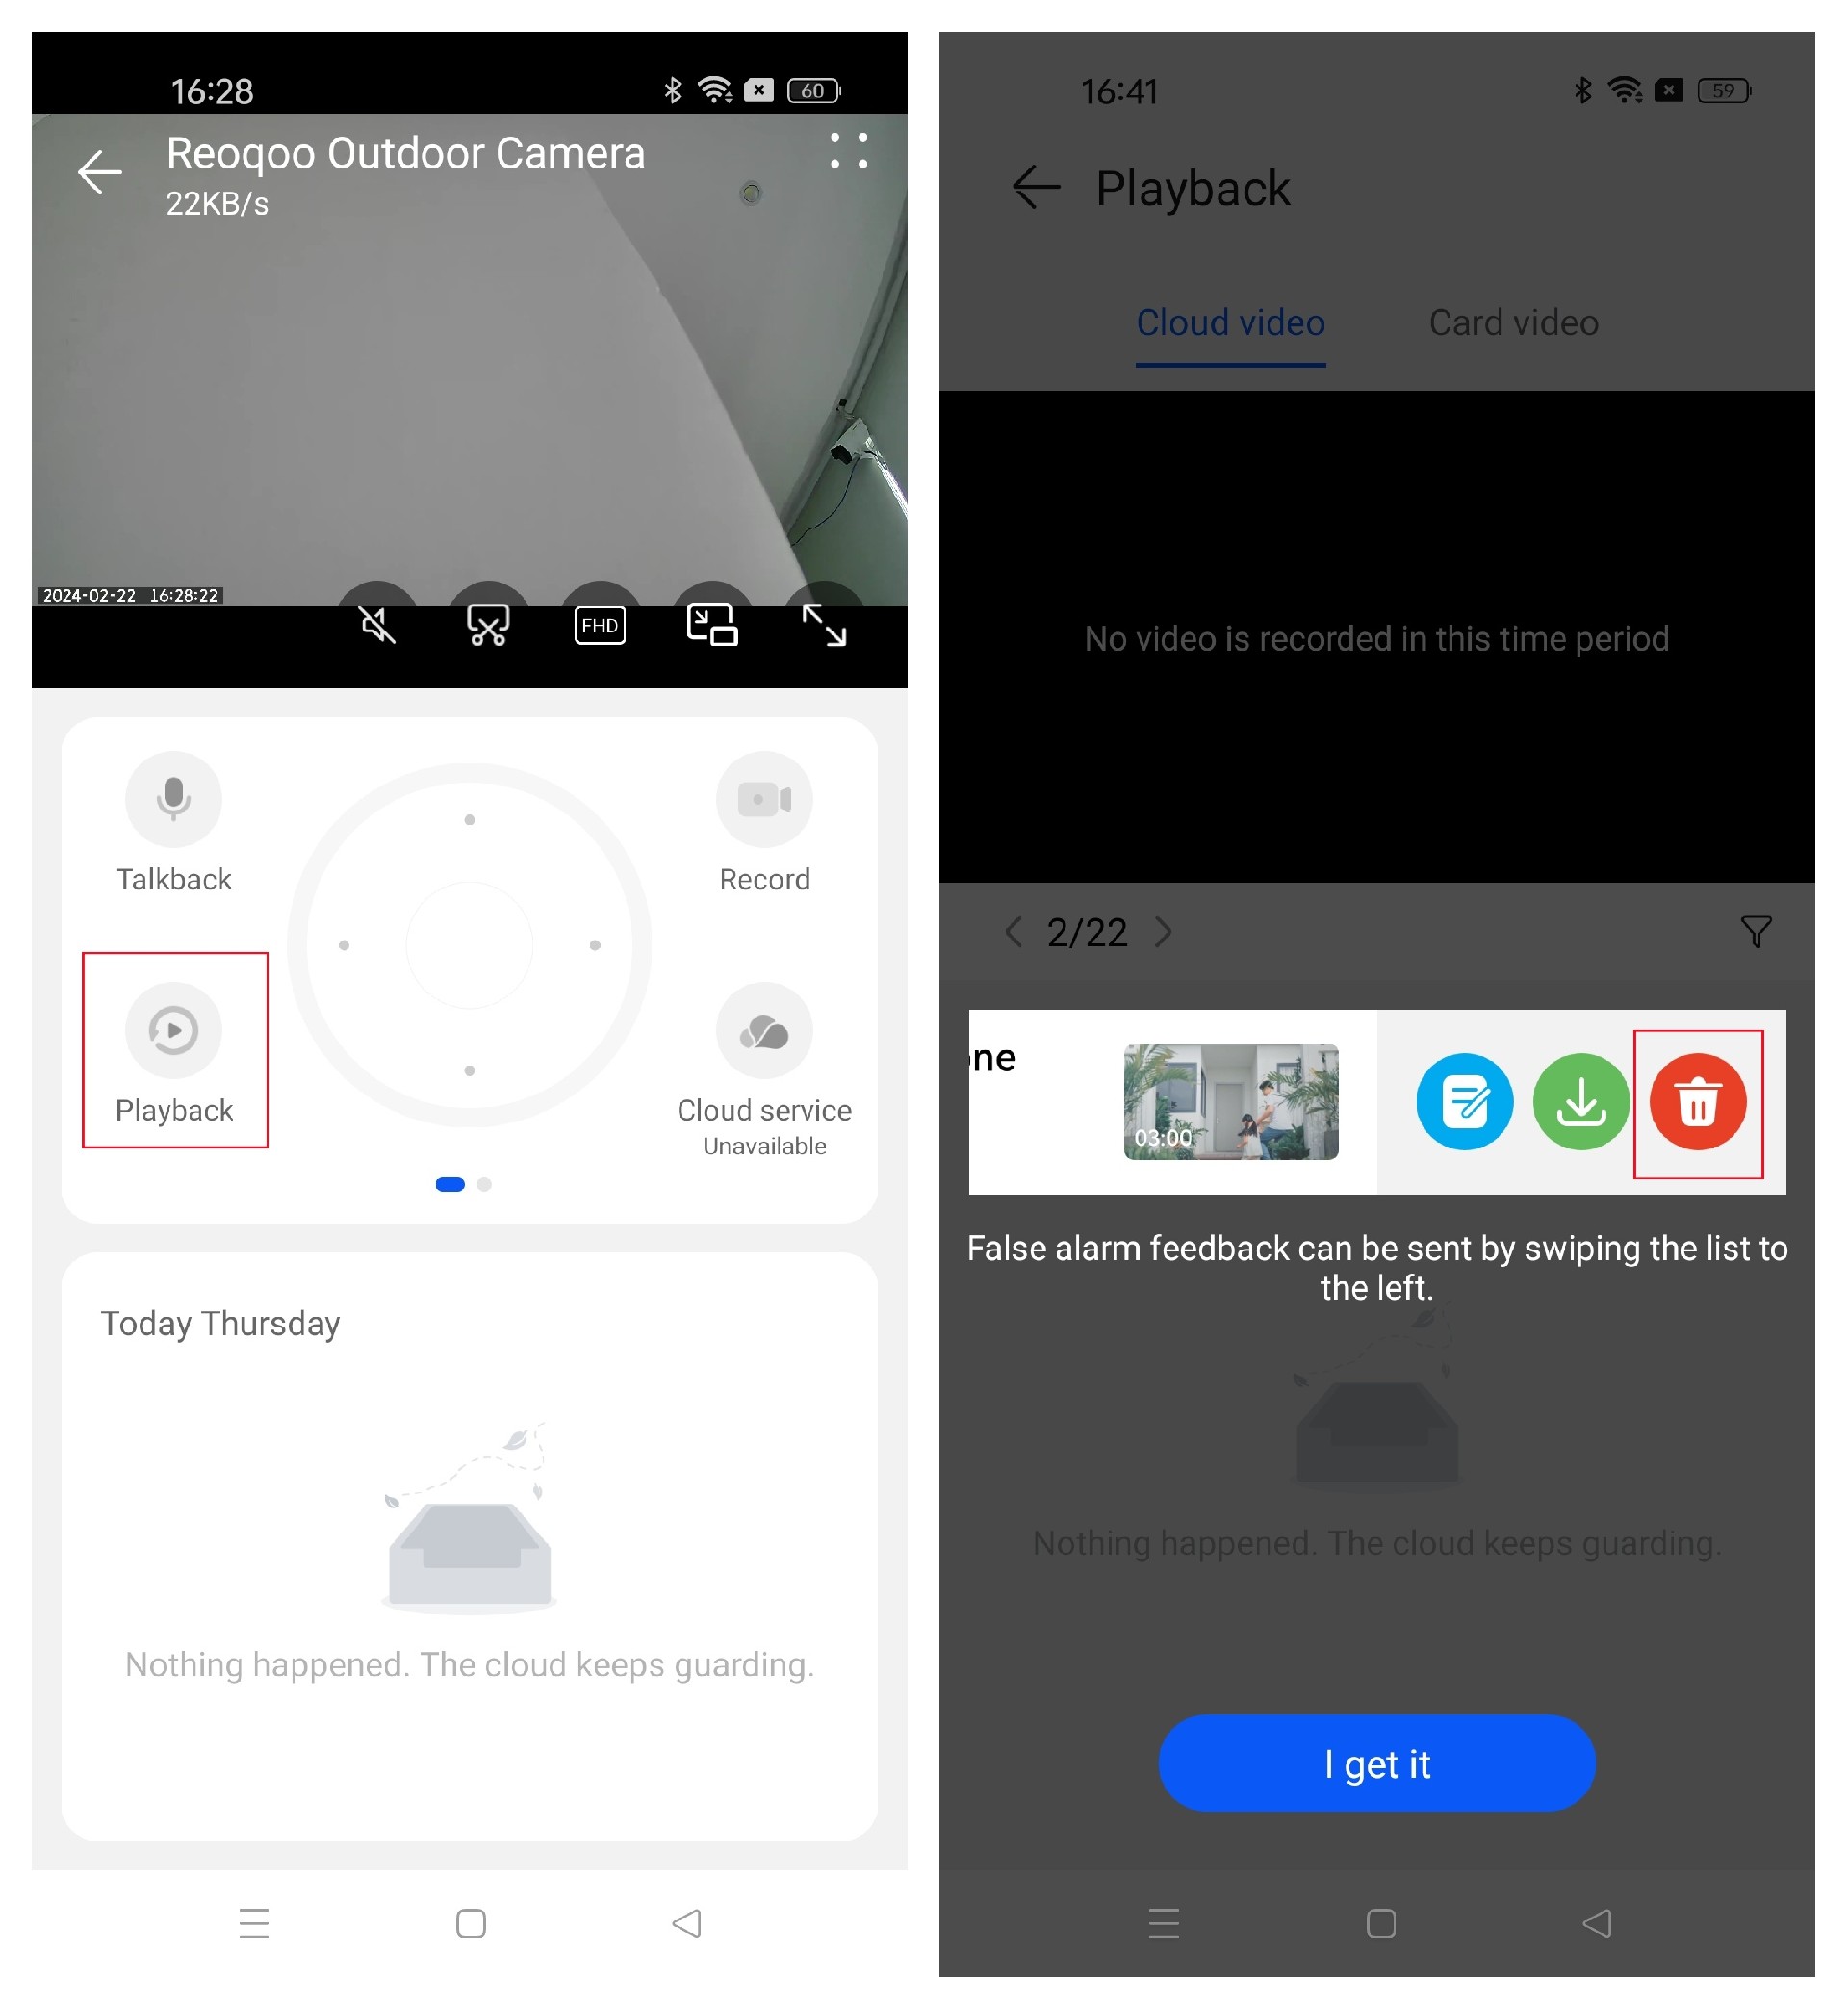
Method 2: To delete individual records, enter the reoqoo App > reoqoo Camera > Click "Playback" > Select a single record, long-press the video, and swipe left to delete.
Note: cloud records cannot be recovered after deletion.
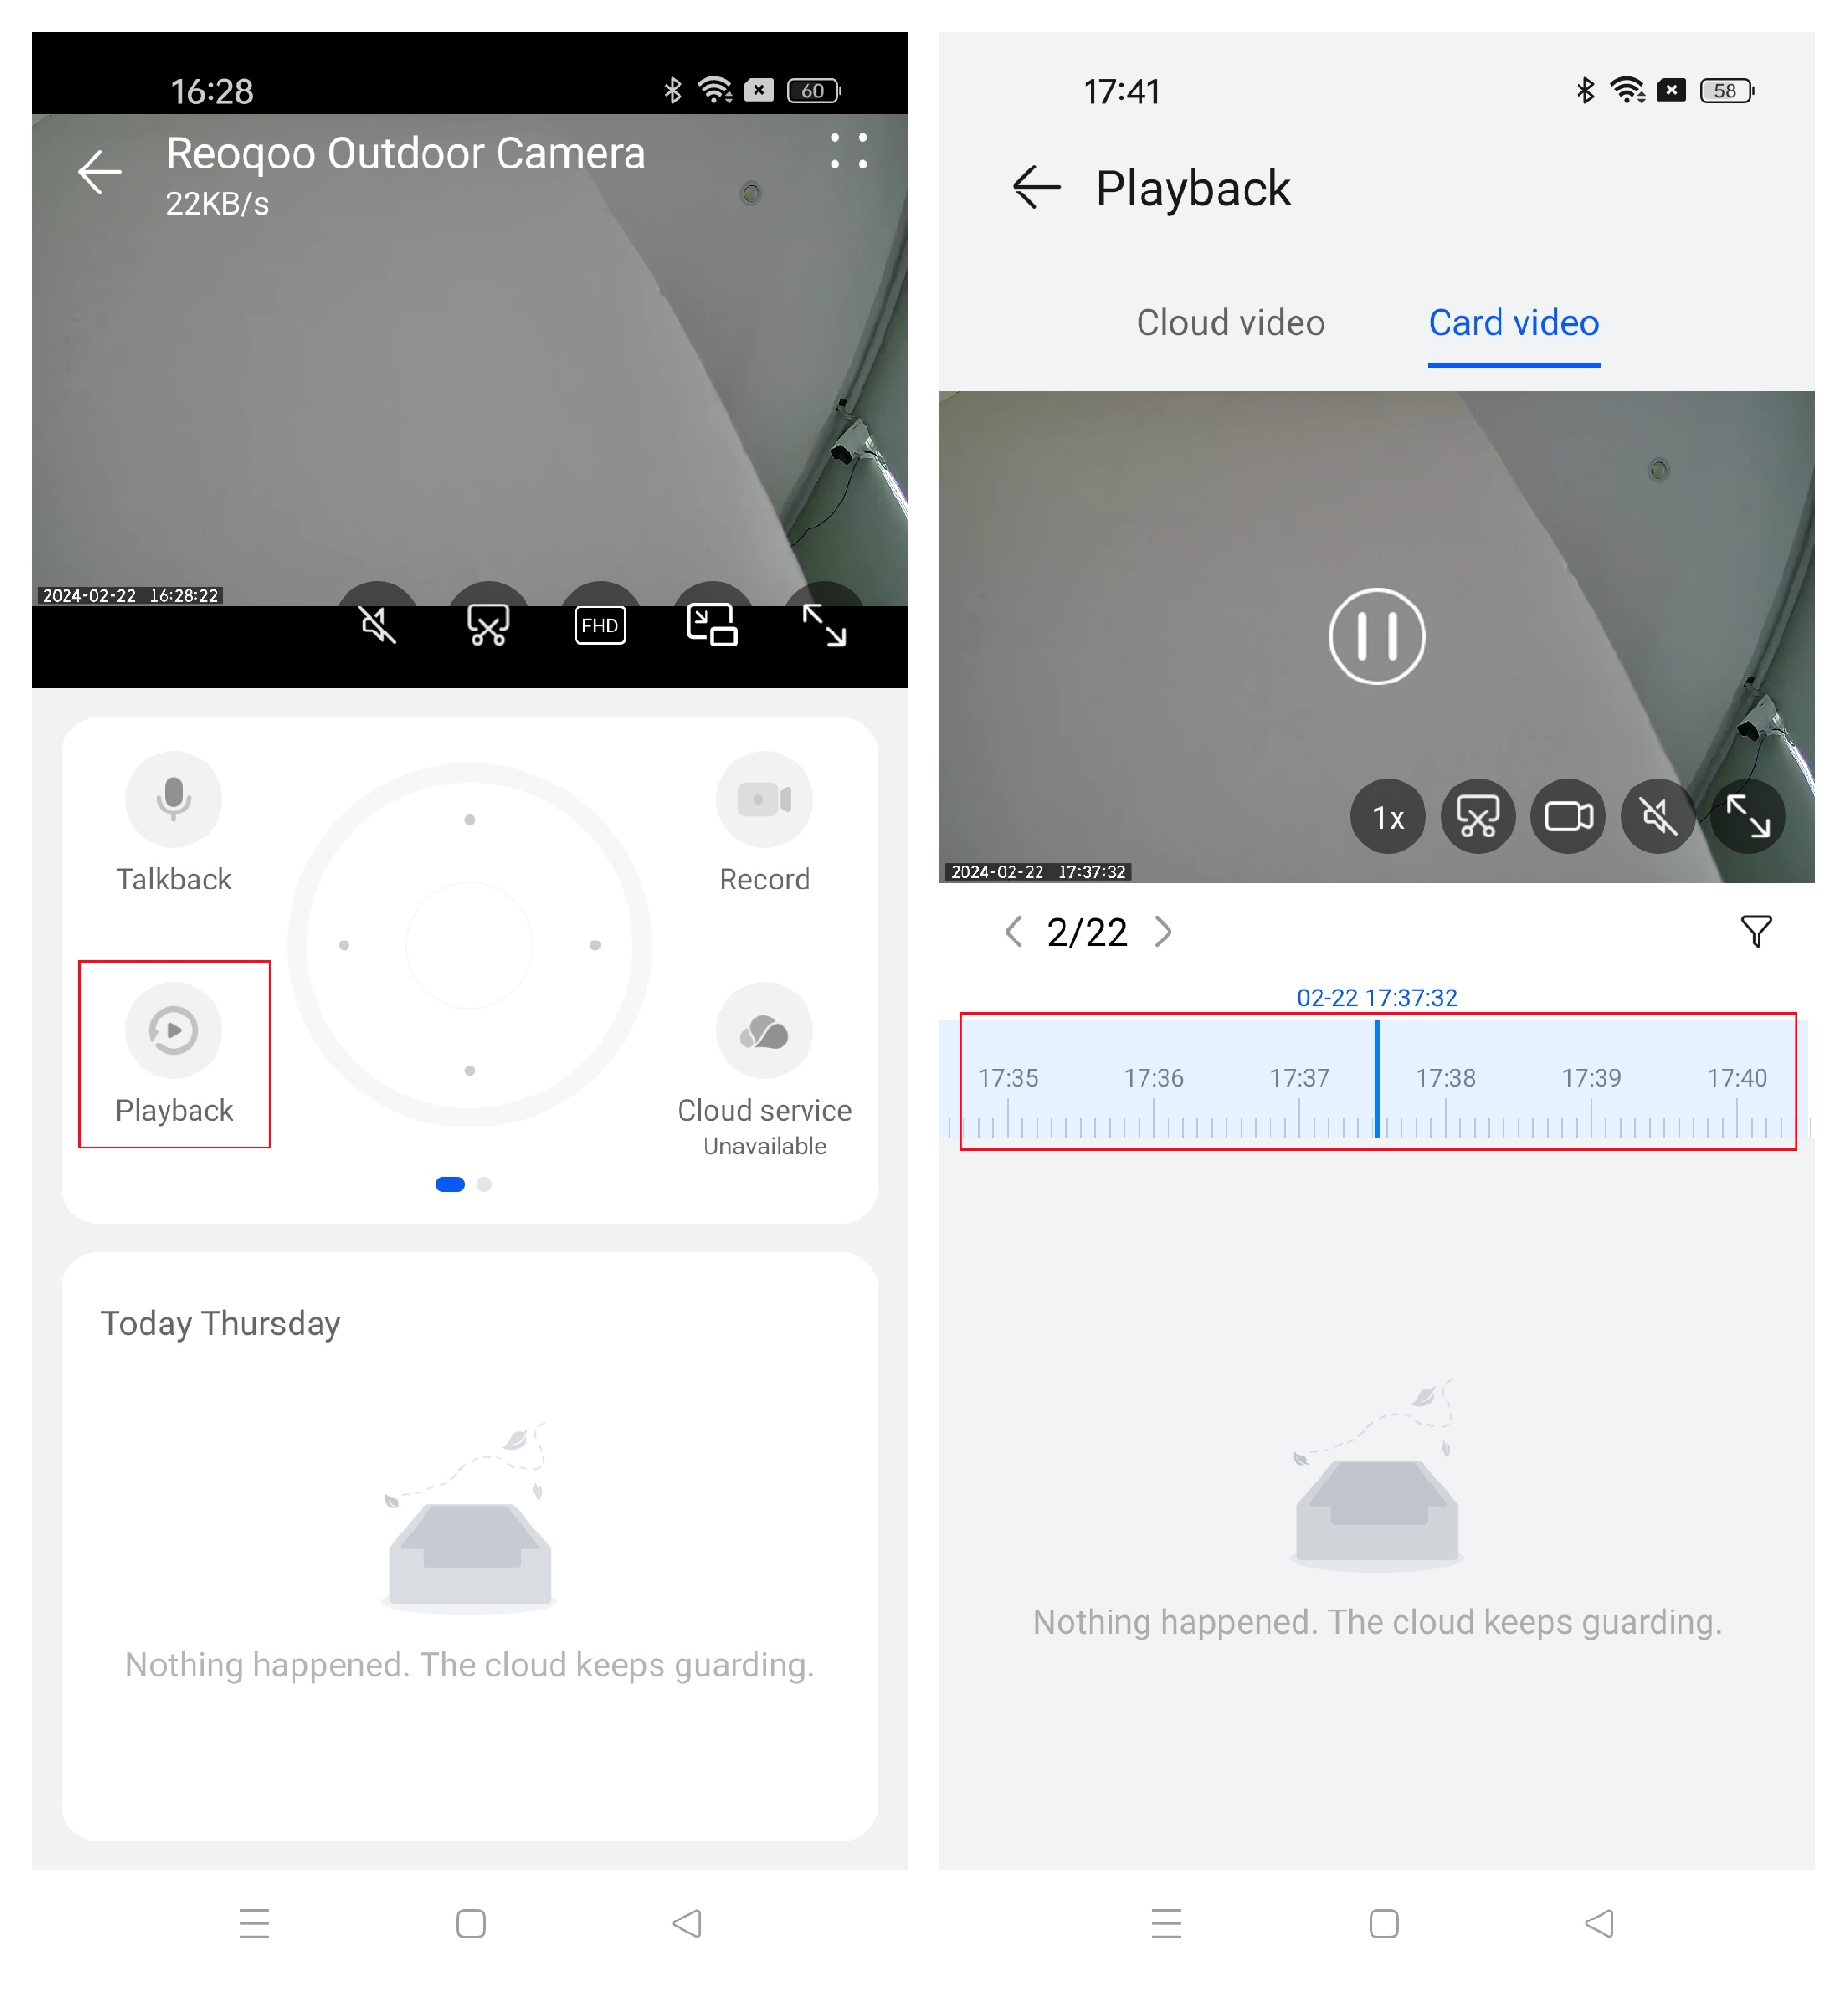
Dear reoqoo user,It can be viewed as follows:
1. Mobile App Playback:
• Enter reoqoo App > reoqoo Camera > Playback > Card Recording.
• Drag the timeline to view historical videos by time.
2. Computer Playback:
• Insert the Micro SD card into the computer with a card reader and view it with a standard MP4 player.
Dear reoqoo user,Yes, you can turn off the cloud recording function as follows:
Open the reoqoo App > reoqoo Camera > click the top right corner to enter the settings page > turn on Smart Home Guarding > Cloud Recording > turn off the "Cloud Recording" button (it will be grayed out).
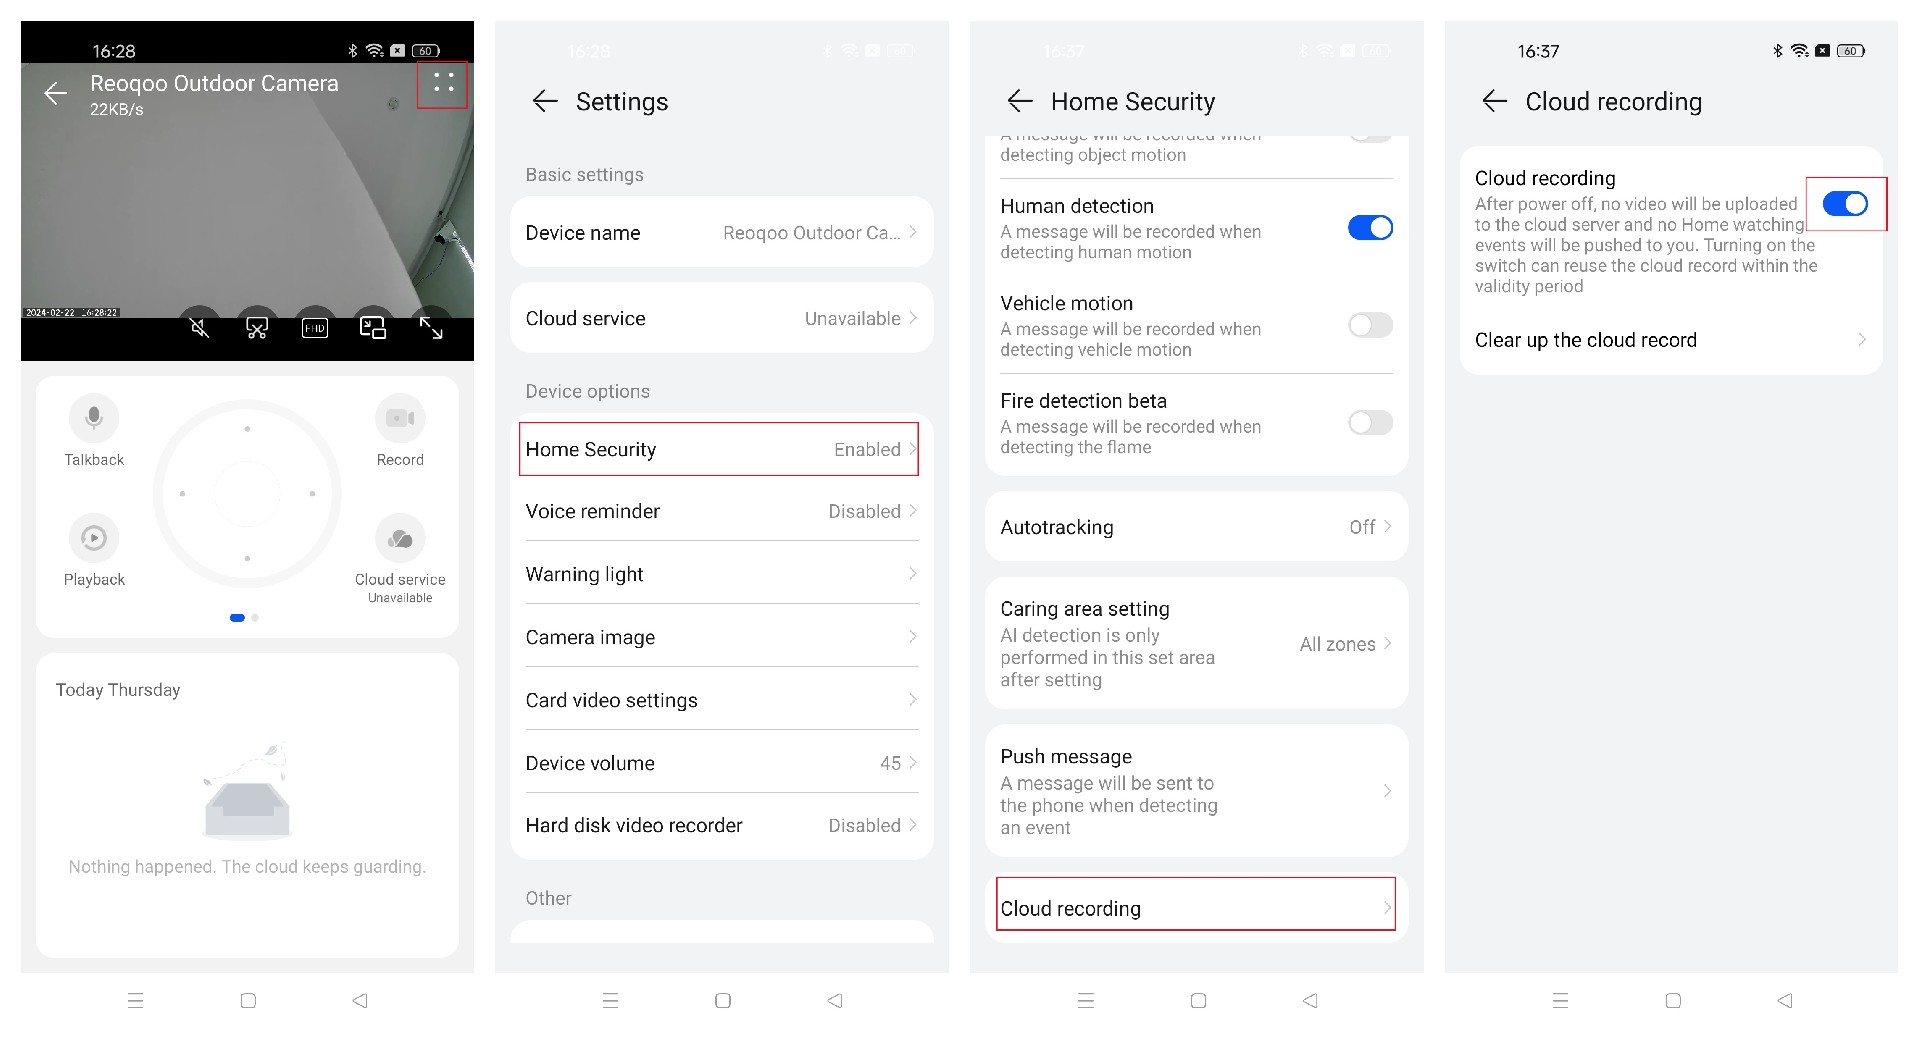
Note:After turning off, recordings will not be uploaded to the cloud server, and home monitoring events will not be pushed. You can re-enable cloud recording within the validity period.
Dear reoqoo user,To transfer reoqoo Camera cloud service packages, please follow the steps below:
Step 1: Remove the Camera with the purchased cloud service.
Enter reoqoo App > reoqoo Camera > Click “∷” to enter the “Settings” interface > Scroll to the bottom and click “Delete Camera.”
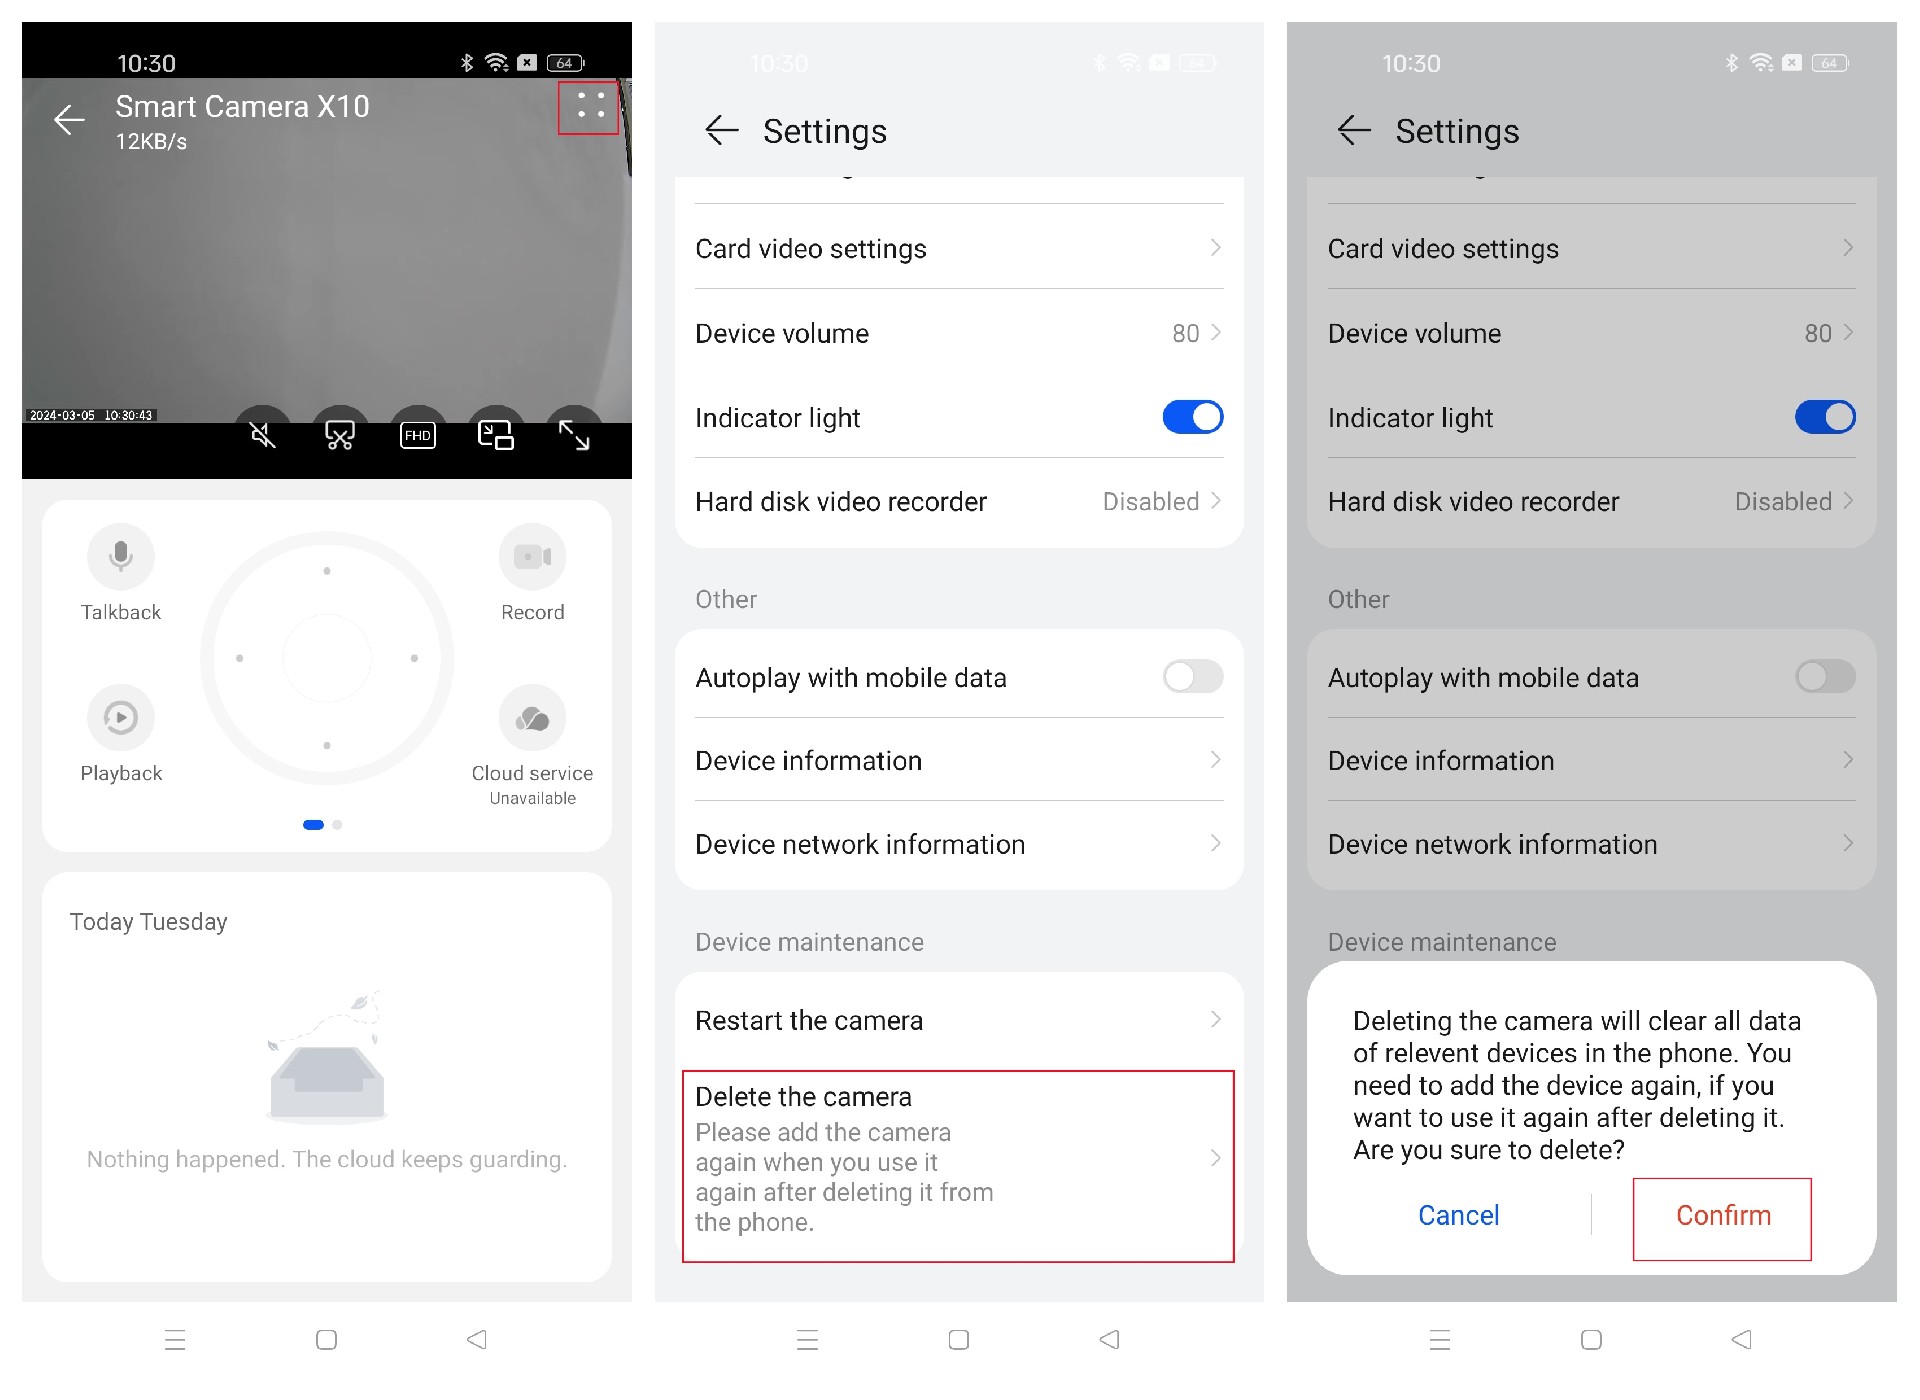
Step 2: Transfer the cloud service package.
Enter the “Settings” page of the Camera that needs to use cloud services, click “Cloud Service,” and it will prompt “Service Transfer.” Then click “Transfer” to proceed.
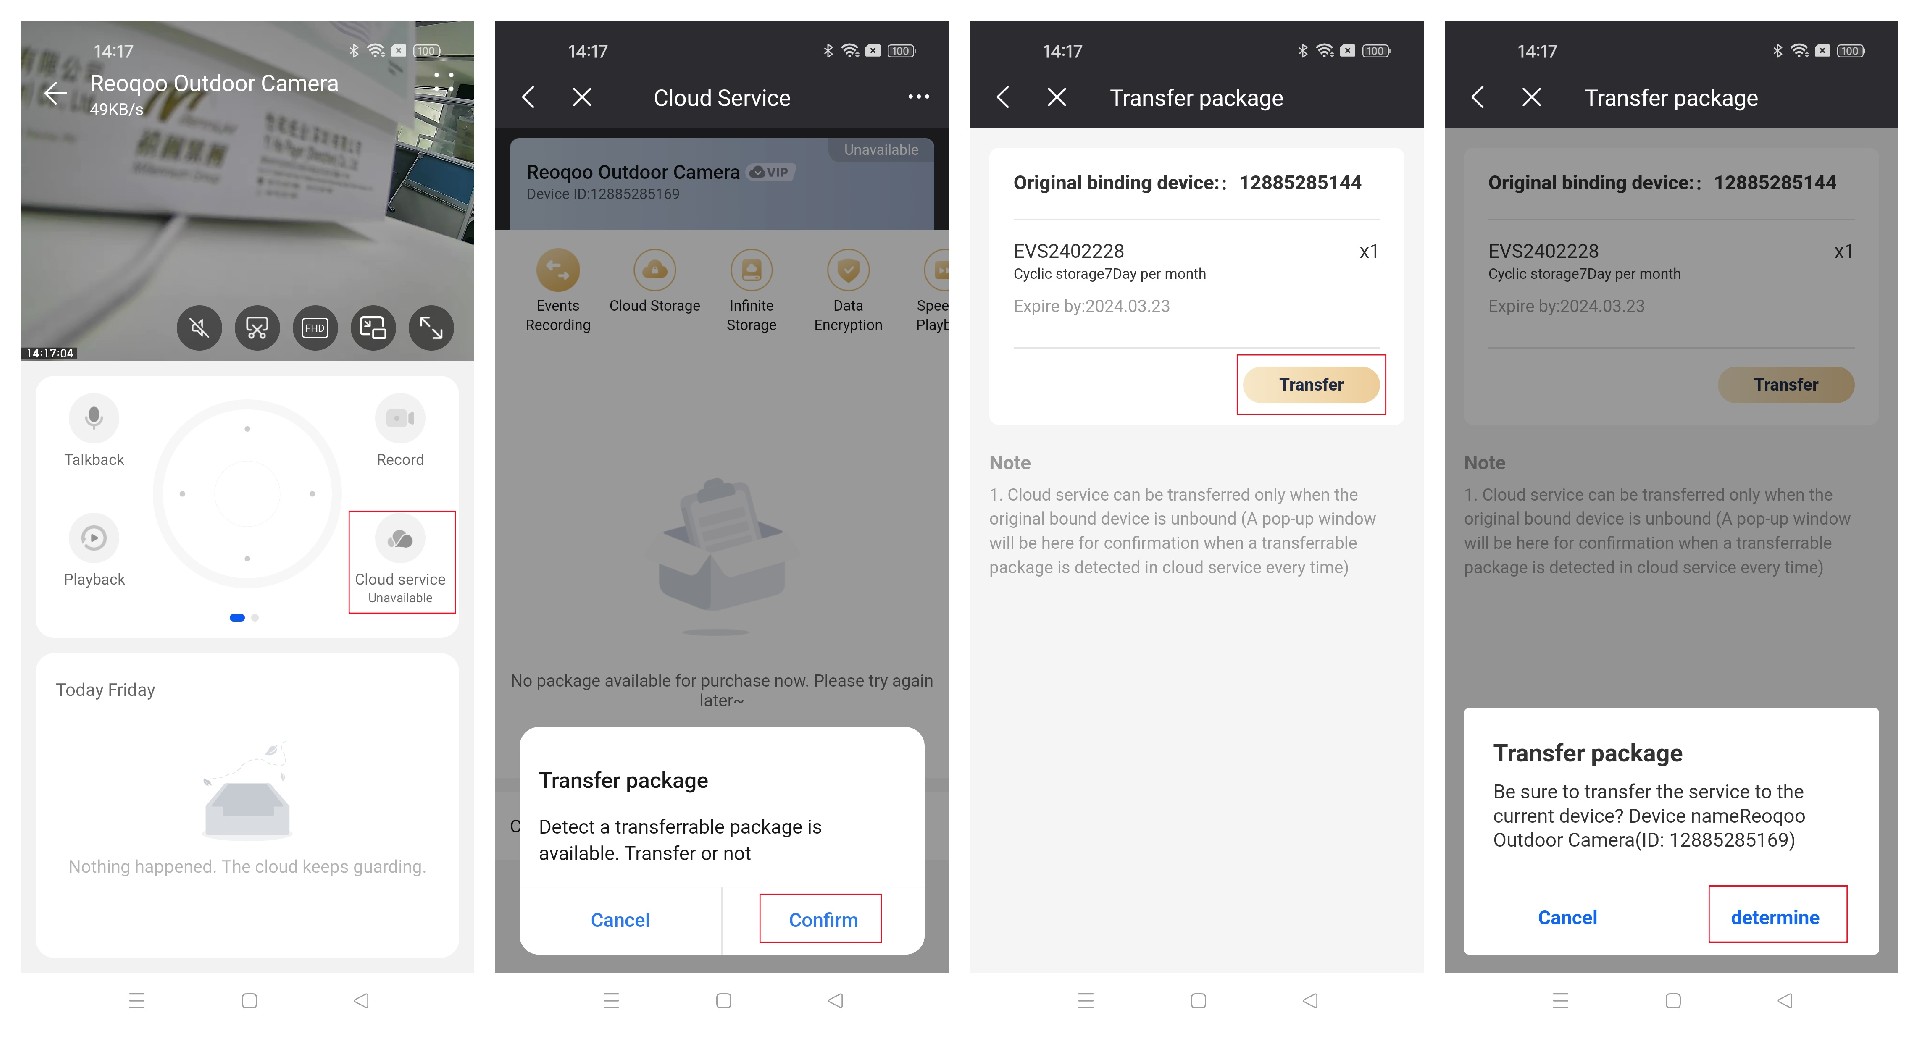
Note:
1. Package transfer only supports transfer between devices of the same model and does not support transfer to other camera models.
2. After deleting the original Camera and transferring the cloud package to the new Camera, the uploaded historical recordings of the original Camera will be deleted and cannot be viewed. New recordings will only be uploaded to the playback of the transferred device.
3. Cloud services are tied to the owner's account.
Dear reoqoo user,To use reoqoo Camera cloud services, please follow either of the methods below:
Method 1: Enter reoqoo App > reoqoo Camera > Click “∷” to enter the “Settings” interface > Cloud Service > select the target package and follow the prompts to complete the operation.
Method 2: Enter reoqoo App > reoqoo Camera > click the function keypad “Cloud Service” > select the target package and follow the prompts to complete the operation.
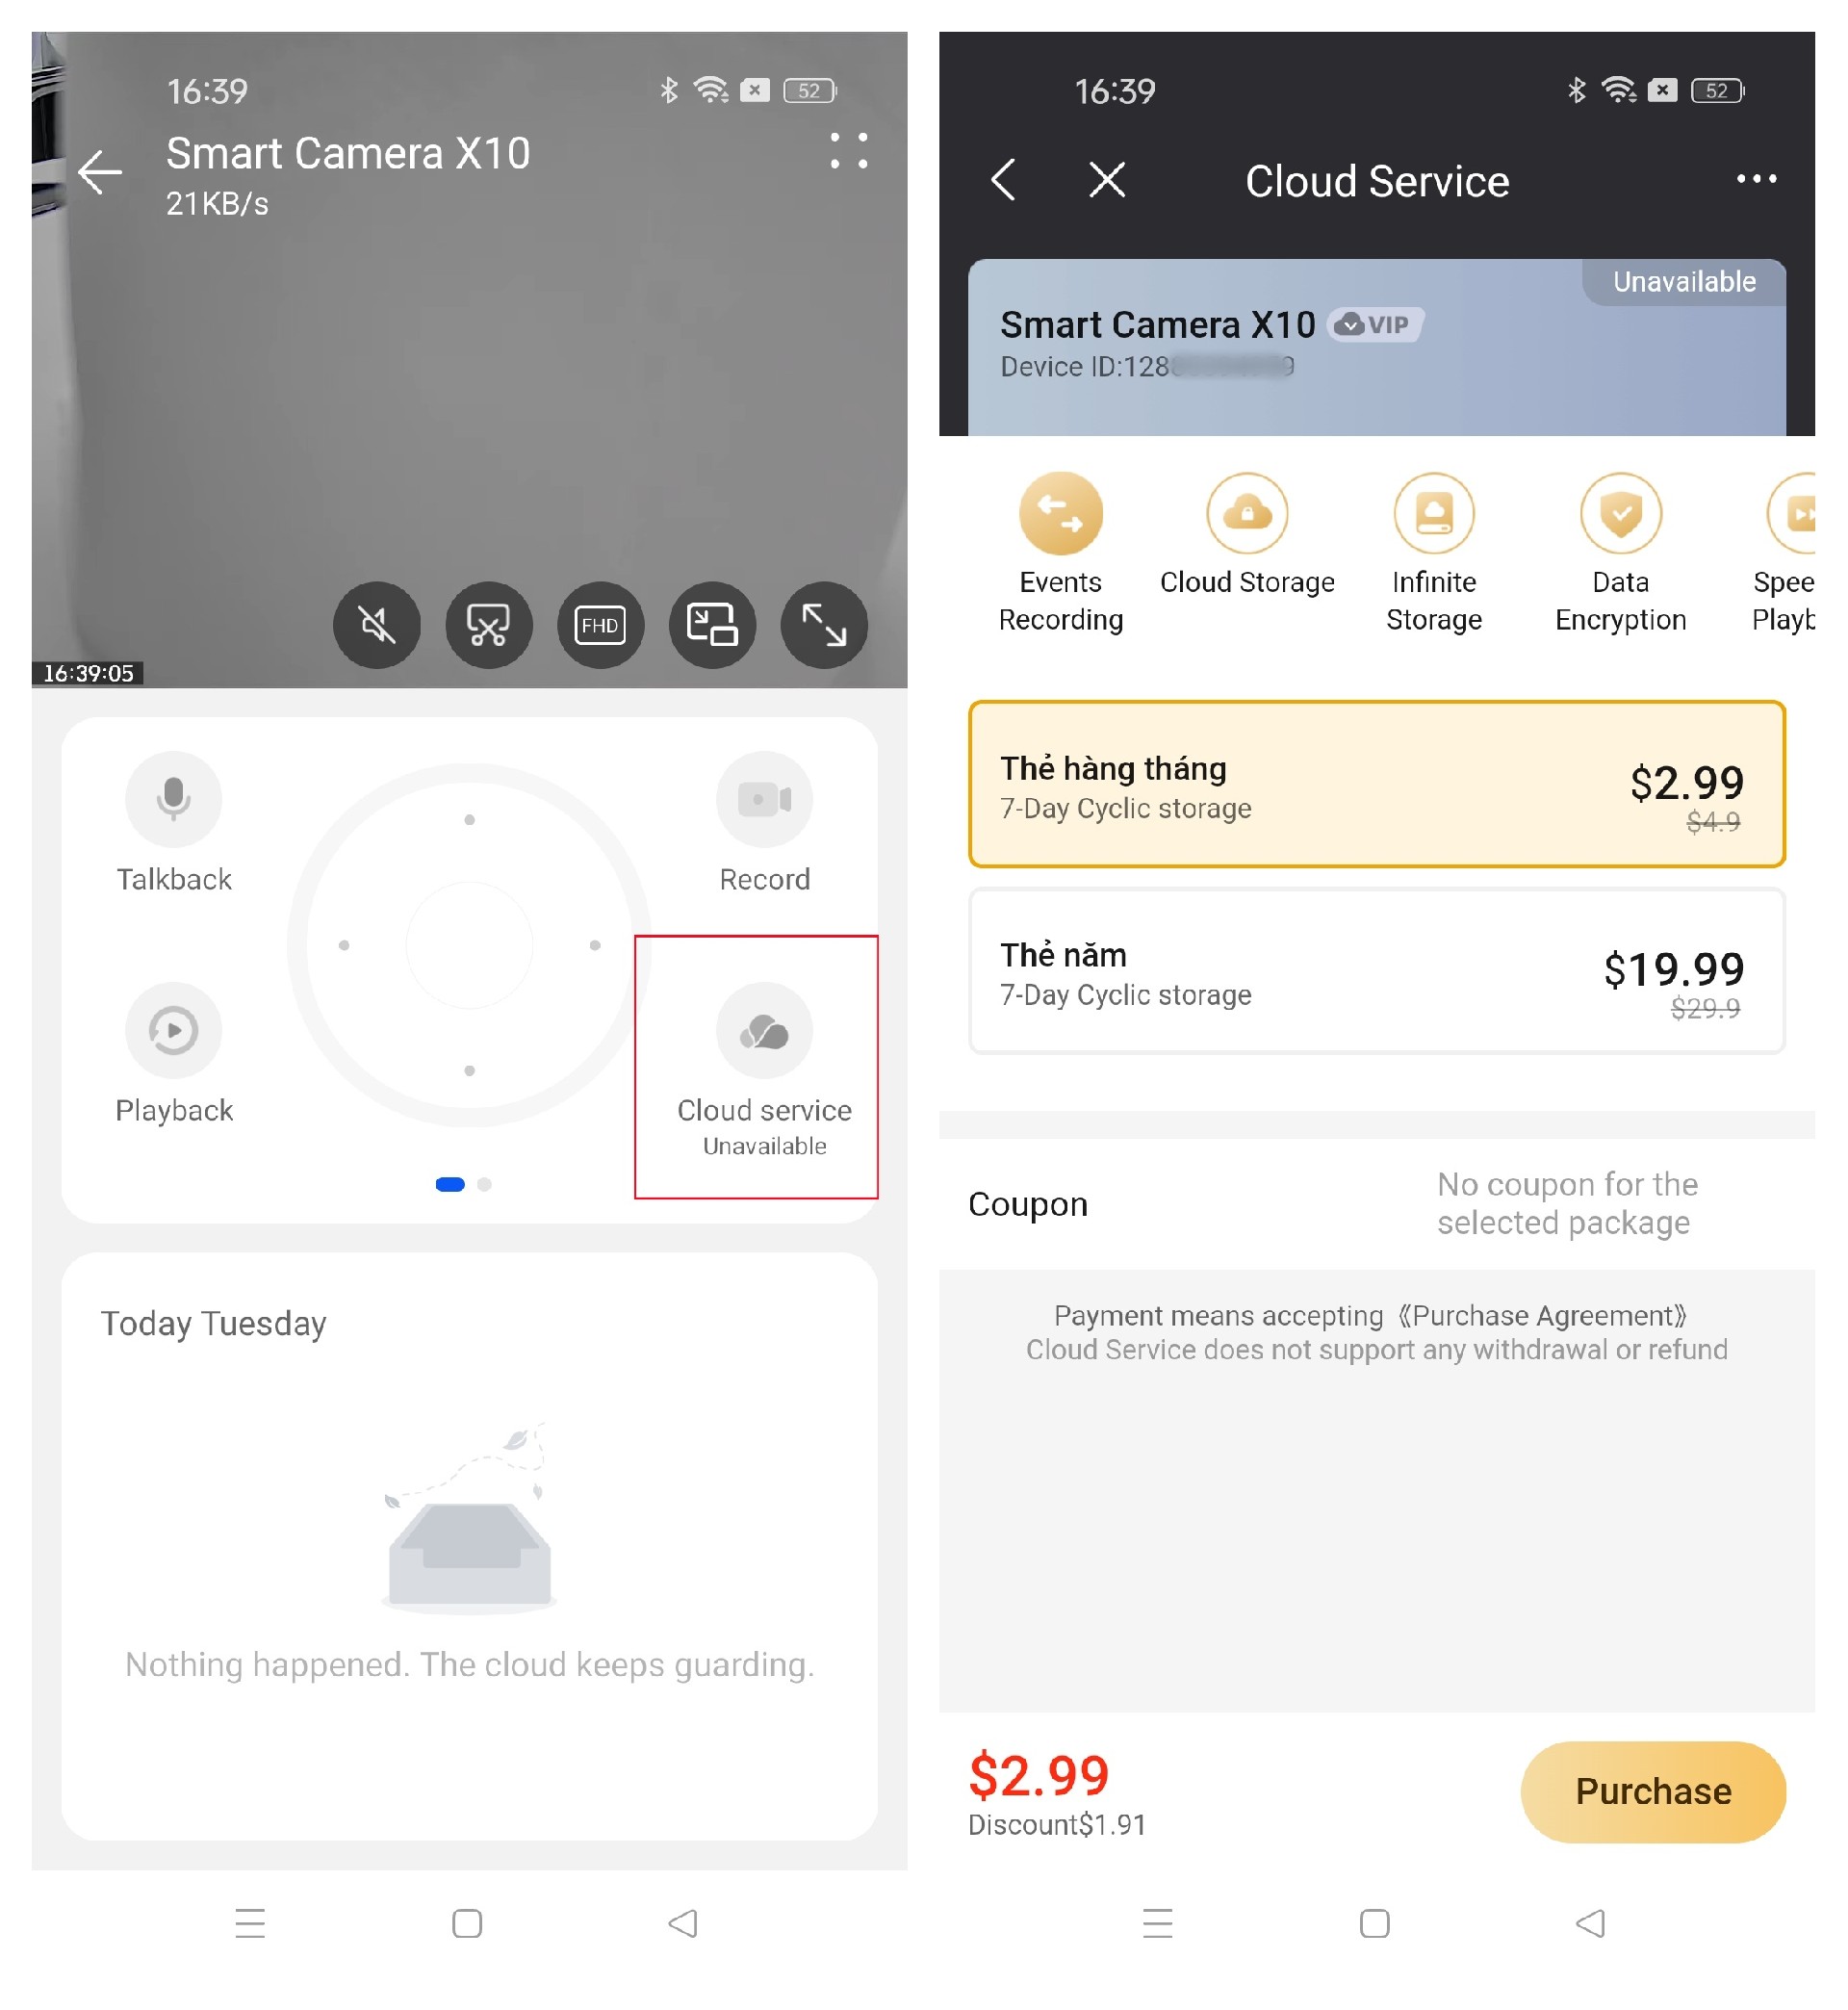
Dear reoqoo user,When you delete the Camera in the App, you only unbind the device from the current account. If you re-bind the Camera with the same App account, the cloud storage data that has not expired can still be viewed.
Dear reoqoo user,For specific pricing for cloud service packages, please refer to the displayed prices on the “Cloud Service” page of the reoqoo App.
Content of Cloud Service Packages: Dynamic recording intelligently captures and uploads action events in the video, such as human activity, environmental changes, or vehicle movements. 24/7 recording saves uninterrupted footage for 24 hours.
Storage Period Explanation: A 7-day loop package means the cloud will retain all monitoring recordings from the past seven days. The 30-day loop package upgrades to store historical records for up to 30 days.
Dear reoqoo user,reoqoo Camera cloud service allows you to upload and store video recordings captured by the Camera to cloud servers. This lets you view and playback recordings anytime, anywhere through the network, and enjoy the data backup feature.
Note: Compared to local storage (such as memory cards), cloud services provide larger capacity, more convenient management, and higher data security.
Dear reoqoo user,You have the option to choose from two cloud storage modes:
• 24/7 Recording: Continuous footage is recorded 24 hours a day, which is suitable for users who need comprehensive monitoring playback.
• Motion Recording: Saves clips only when human or object activity is detected within the monitoring area, suitable for users who focus on saving storage space and prioritizing viewing important events.
Please choose the appropriate cloud storage package that fits your needs.
Dear reoqoo user,If you find the camera position has shifted after prolonged use, please follow these steps:
1. Follow the Path for Pan-tilt Calibration: Open reoqoo App > reoqoo Camera > click the top right “∷” settings page > Image screen > select “Pan-tilt Calibration,” then confirm.
2. Post-calibration: After calibration, be sure to avoid manually rotating or twisting the Camera's pan-tilt or ball head during daily use to prevent affecting its normal operation and avoid similar issues in the future.
Dear reoqoo user, if the issue persists after attempting the steps mentioned above, don’t worry. We understand your frustration and are here to help. To better assist you, please click on the problem feedback and provide the following:
1. A detailed description of the issue.
2. Video or screenshot evidence of the device malfunction.
Upon receipt, we’ll promptly investigate and address your concern and ensure a swift resolution.
Dear reoqoo user,To enable reoqoo Camera tracking, follow these steps:
Enter reoqoo App > reoqoo Camera > click "∷" to enter the "Settings" interface > Smart Home Guarding > turn on the "Auto Tracking" button. Choose between human tracking or object tracking as needed.
Note:Support for vertical and horizontal tracking: After enabling motion tracking, the Camera will track moving objects or human forms in the frame, and after 10 seconds of inactivity, the Camera will automatically return to its previous tracking position.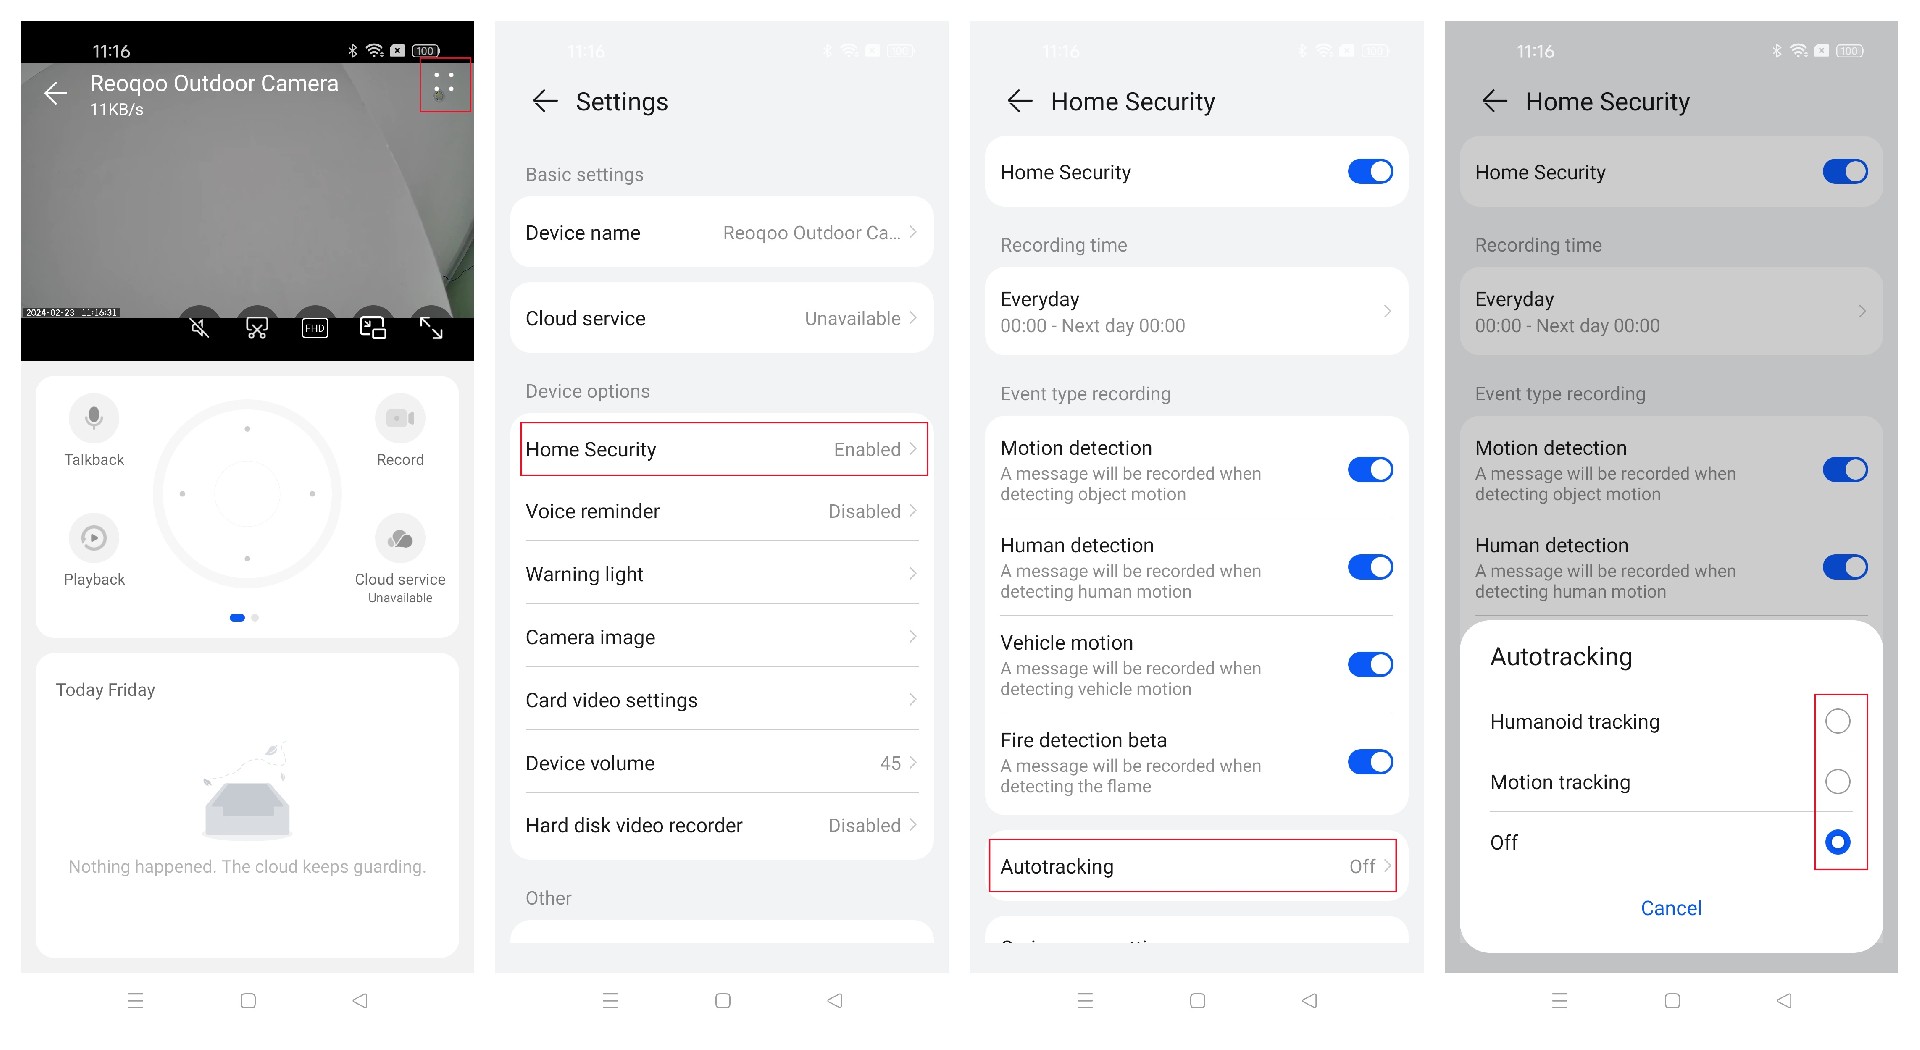
Dear reoqoo user,Follow these steps to share recorded videos:
1. Record Video During Monitoring:
Enter reoqoo App > reoqoo Camera > Recordings and follow the prompts to complete the operation. The recording is saved in the App album. Then click on the album function to find the saved video and choose> Tap to share> Follow the page prompts to select social tools to share.
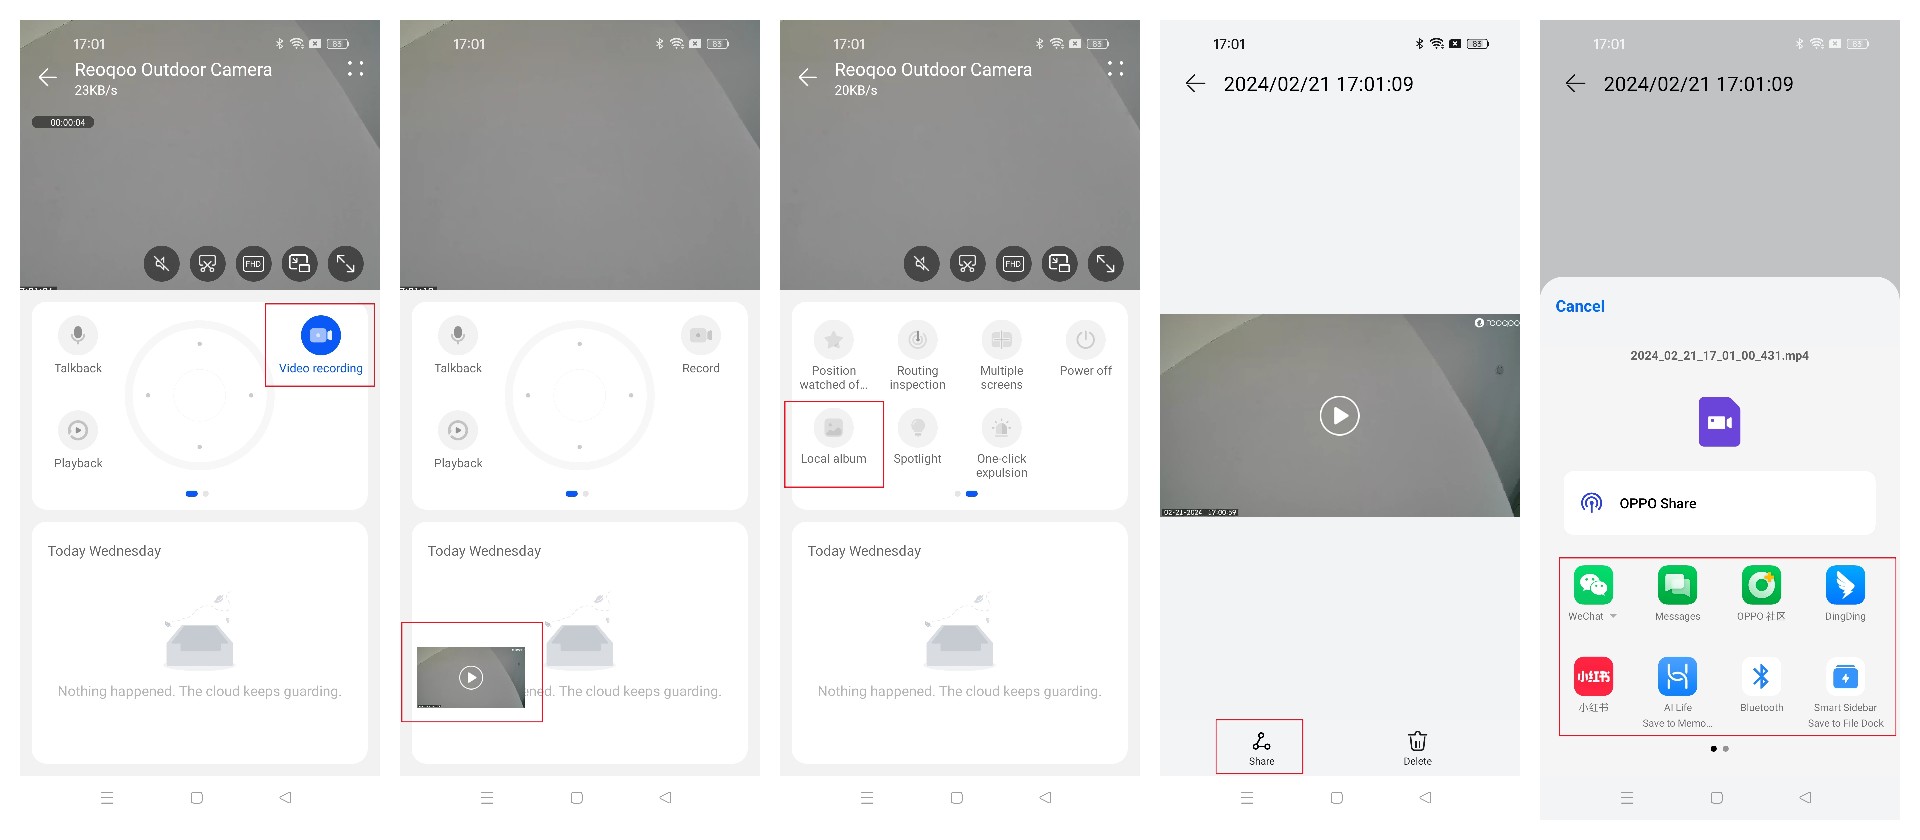
2. Share Recorded Videos of Card Recordings/Cloud Playback:
Navigate to reoqoo App > reoqoo Camera > Playback > Card recording > Select the timeline at the start of the recording time > Record button. After recording, the video is saved in the App's album. Tap on the album function to locate the video, then choose “Share” and follow the prompts to select social tools for sharing.
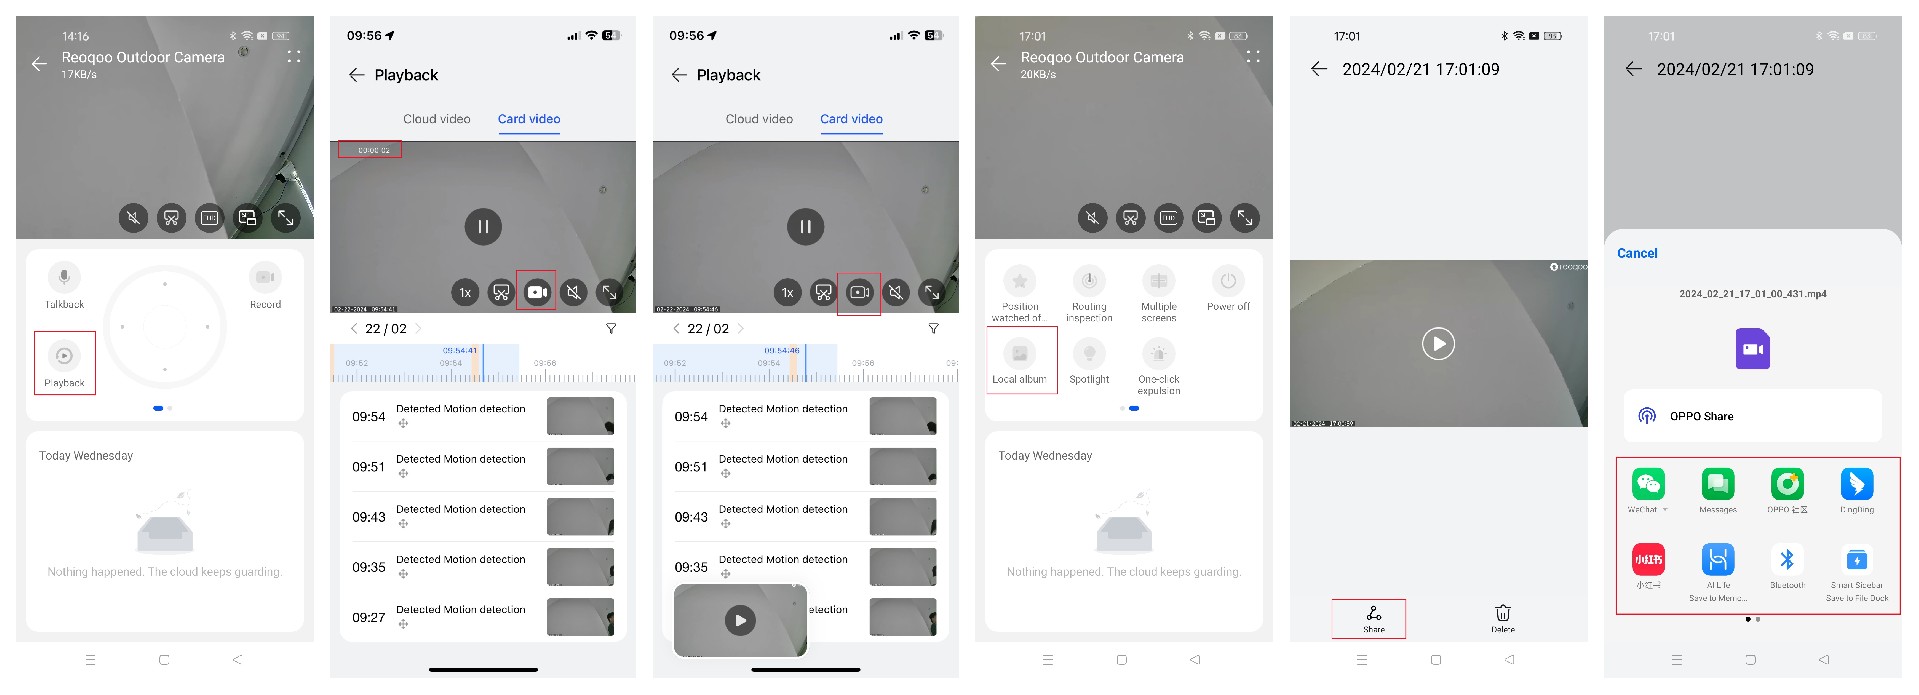
Note: Videos from cloud playback and card recordings cannot be directly shared. They must be recorded during playback in the reoqoo App before sharing.
Dear reoqoo user,The reoqoo Camera allows up to three devices to be logged in simultaneously using the same App account. Alternatively, three different App accounts (including master and shared accounts) can be logged in to watch real-time monitoring online.
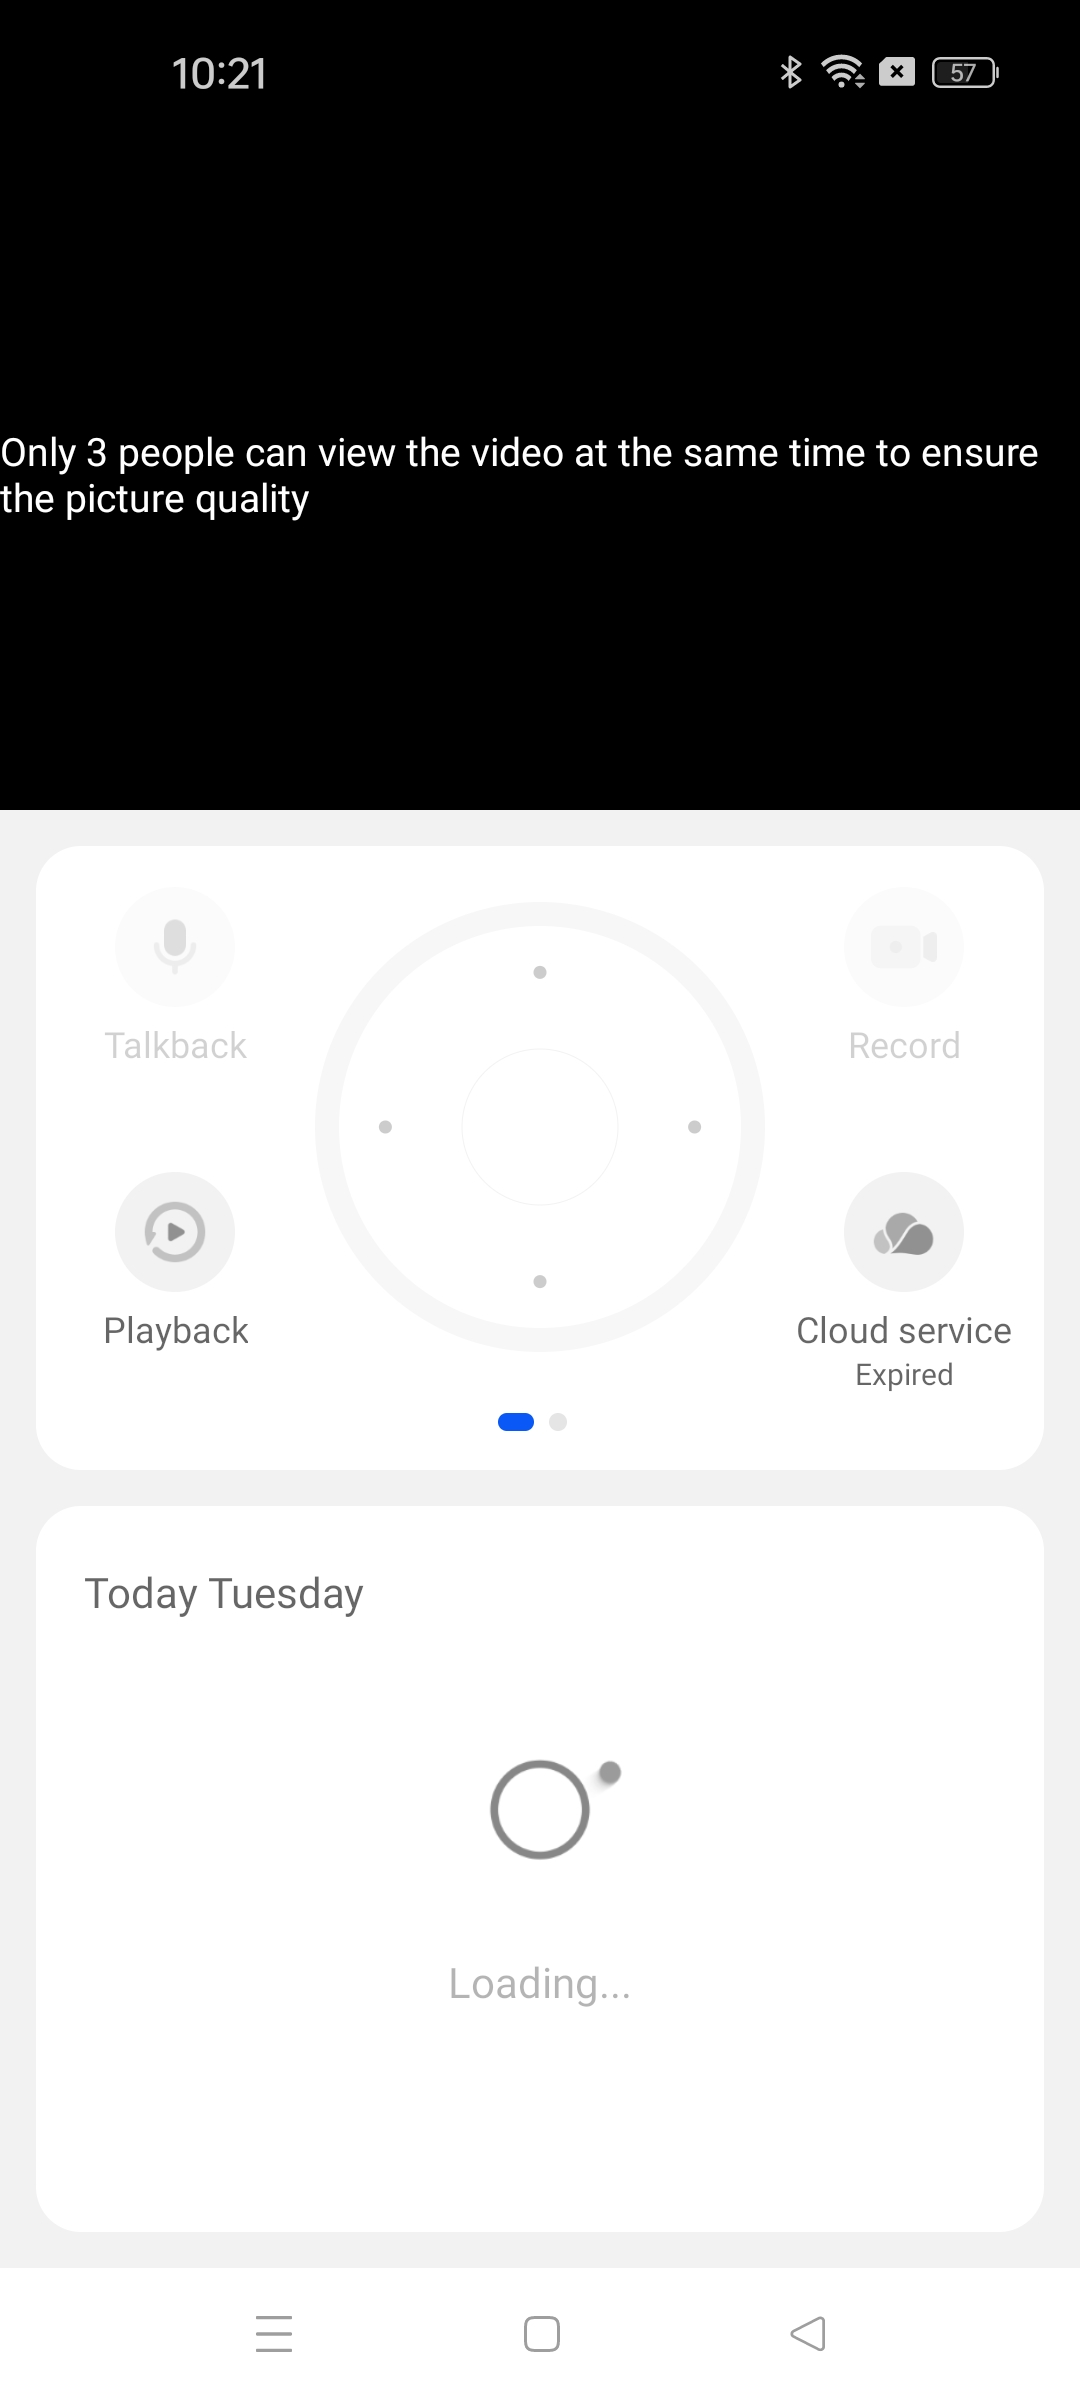
When a fourth person attempts to open the real-time monitoring screen, a prompt will appear stating, “In order to ensure picture quality, only three people can view the video at the same time.” Simply exit the real-time monitoring screen, refresh, and re-enter to watch.
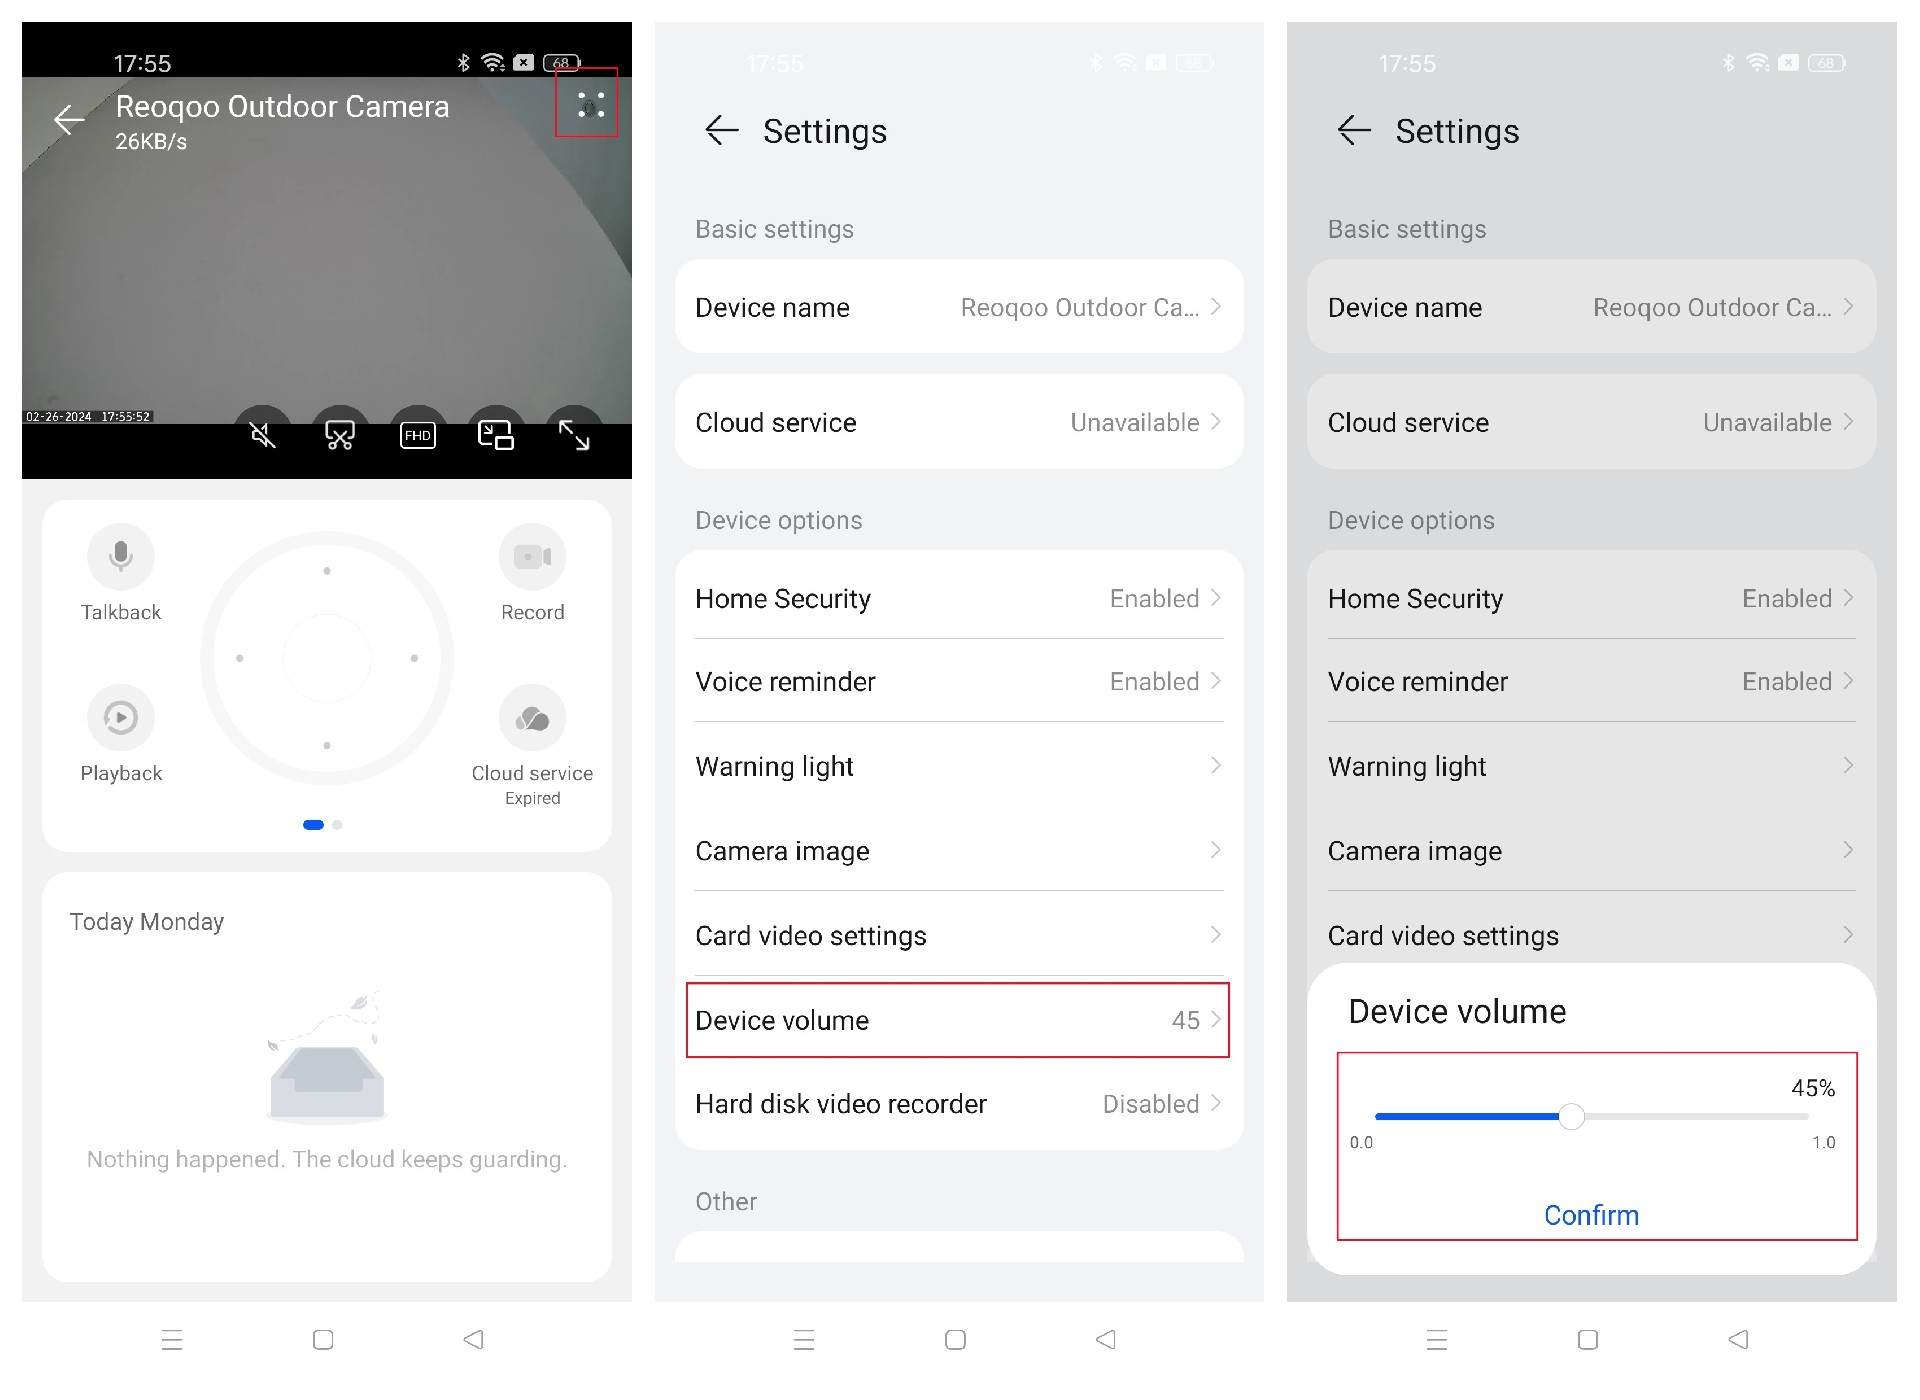
Dear reoqoo user,The reoqoo Camera supports adjusting the sound level and setting the sound change. The operation steps are as follows:
1. Volume Adjustment: enter reoqoo App > reoqoo Camera > Settings in the upper right corner “∷” > Device volume > Slide to adjust.
2. Voice Changer: Enter reoqoo App > Enter the monitoring page > Initiate intercom. The duration of the intercom and voice selection options will be displayed in the upper left corner. Choose to keep the original voice or select another option.
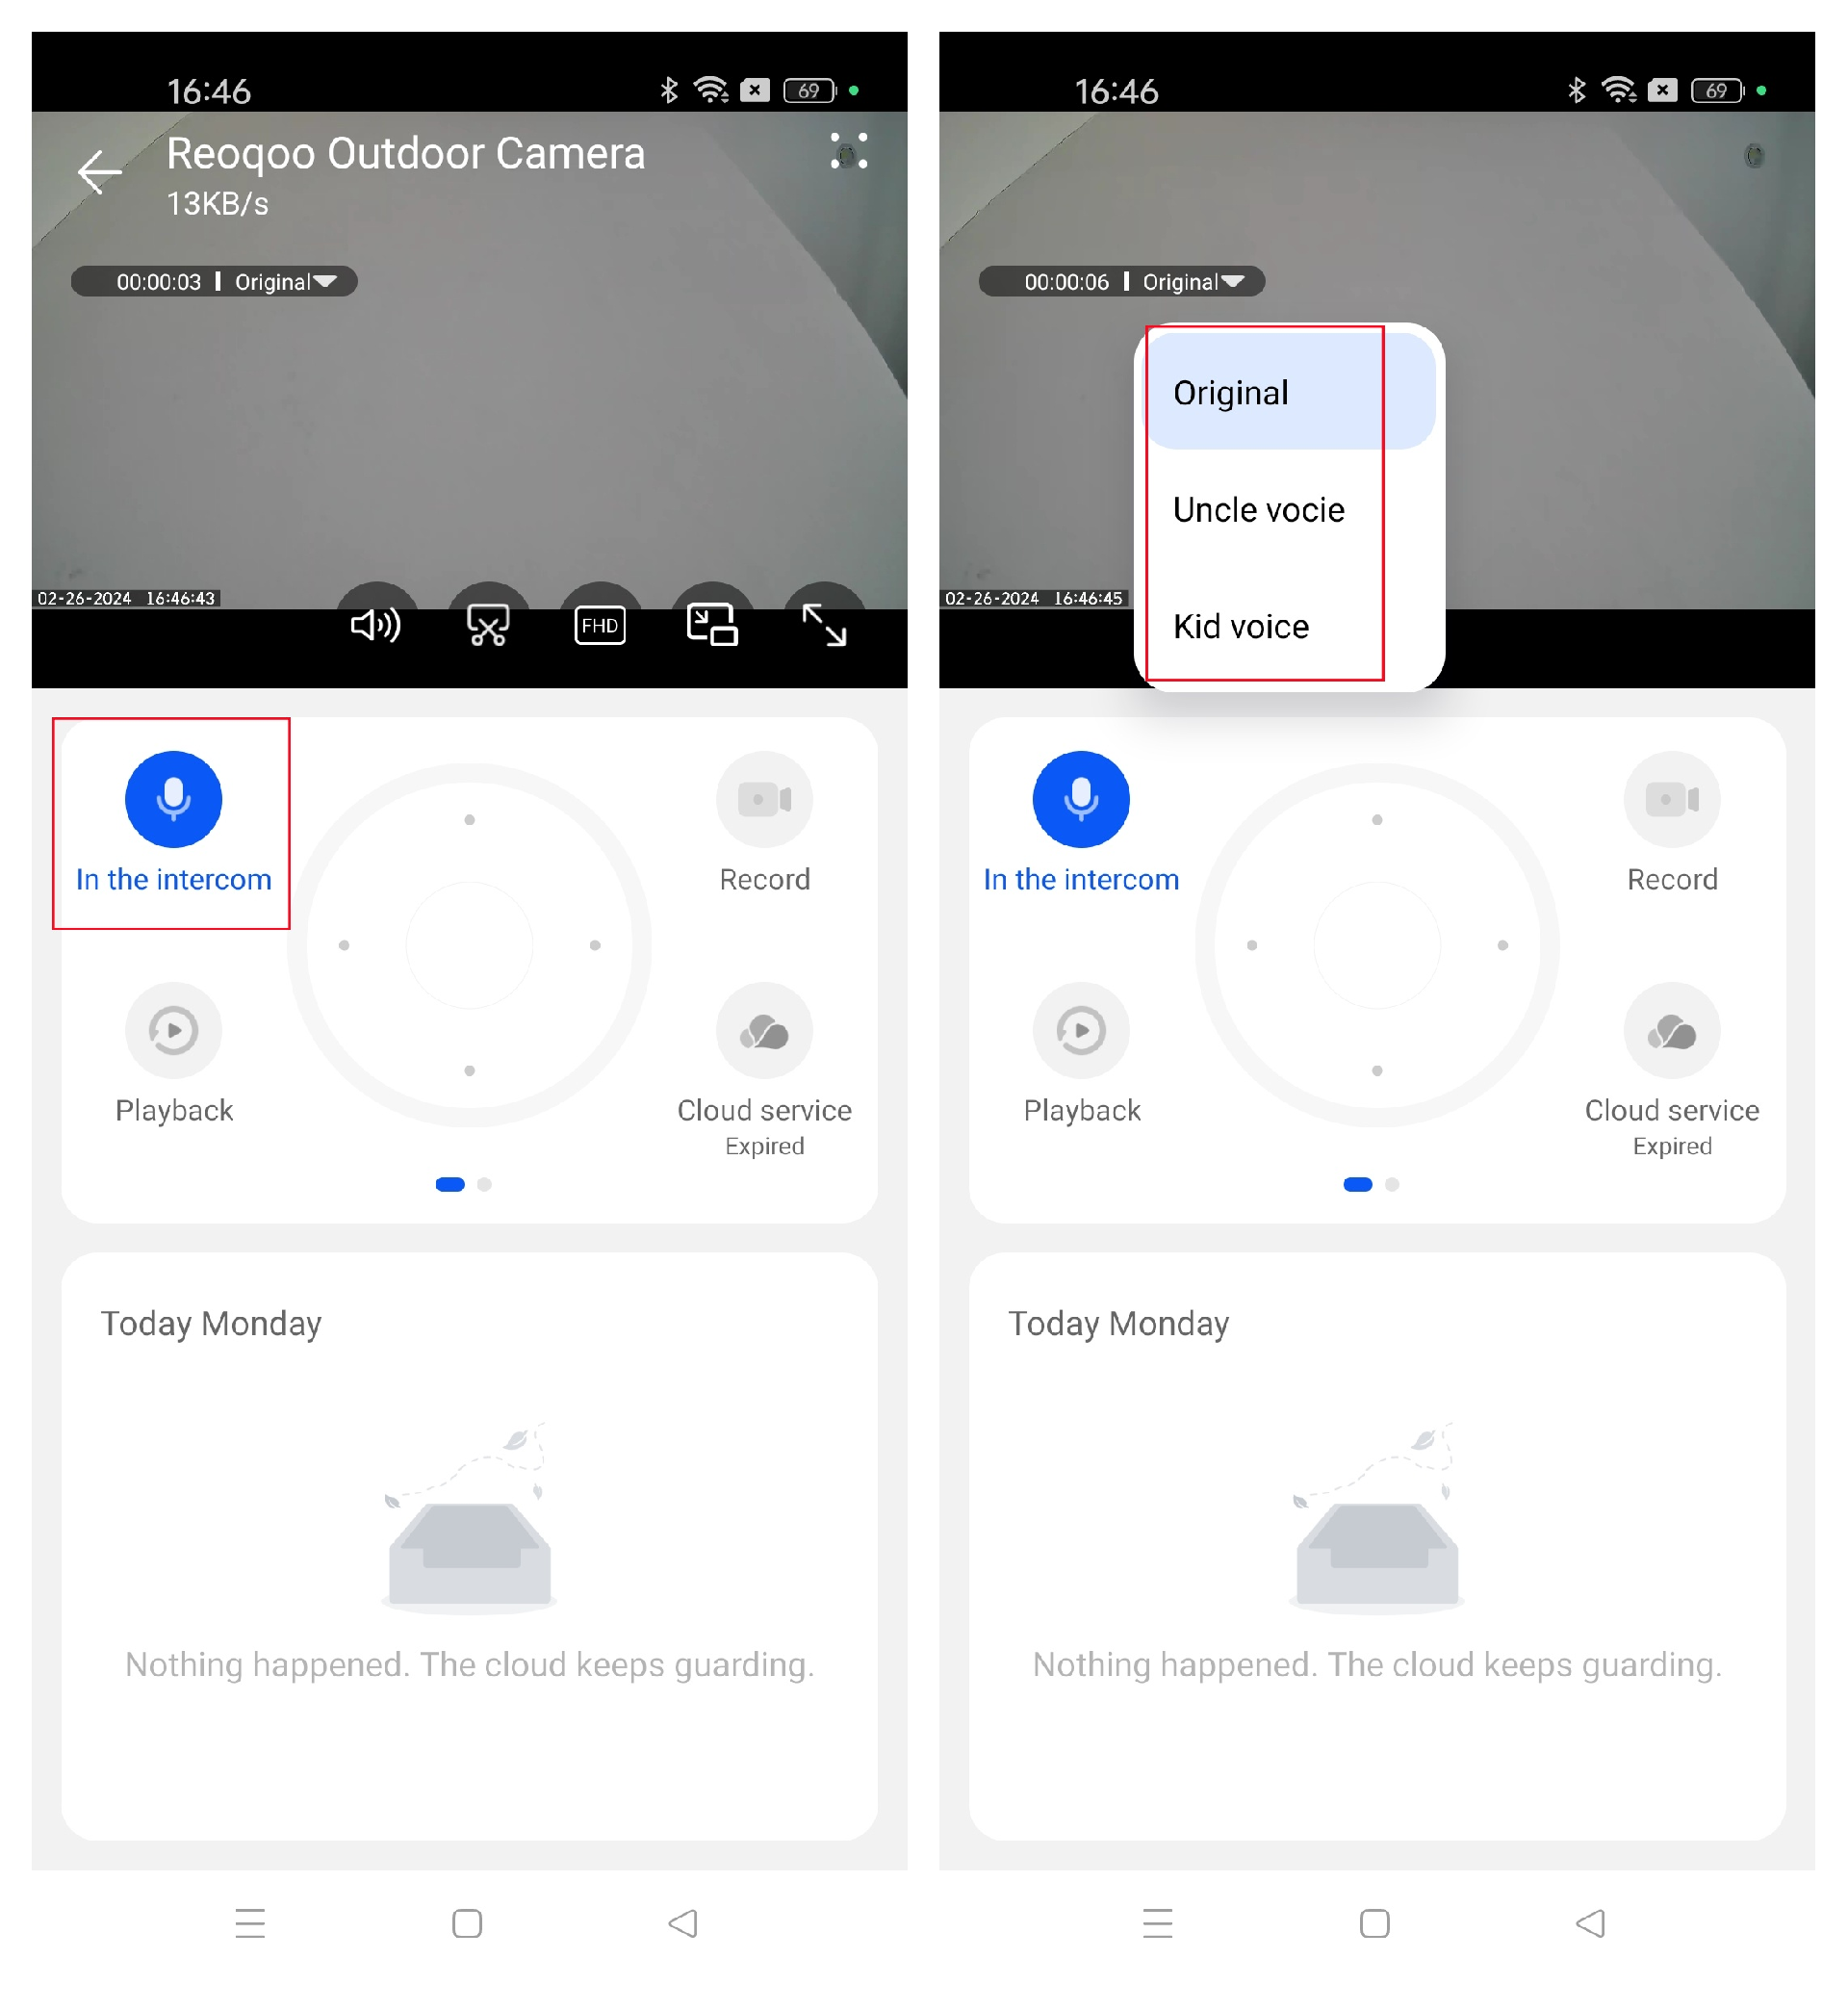
Note:1. Voice change can only be selected after the intercom is activated and cannot be set in advance.2. Voice change is not a memory function and must be re-selected when needed.3. Adjusting the volume of video recording and playback is not supported.
Dear reoqoo user,You can conveniently control various functions remotely through the reoqoo App, including:
1. Real-time Monitoring:
Enter reoqoo App > reoqoo Camera > Monitoring interface.
2. Real-time Intercom:
Enter reoqoo App> reoqoo Camera> Monitoring page> Intercom.
3. Control the rotation of the PTZ:
Enter the reoqoo App>reoqoo Camera > Monitoring page, and rotate the PTZ to adjust the monitoring position as required. Press and hold the arrow key, and the PTZ will rotate continuously in the same direction.
4. View Playback:
Enter reoqoo App > reoqoo Camera > Monitoring page > Playback.
Note: The reoqoo App supports local Micro SD cards and cloud storage. If a Micro SD card is inserted, you can directly access stored videos. Additionally, upon binding your device for the first time, you usually receive a free dynamic cloud video service. Simply enable smart detection features like "motion detection" to automatically record and upload footage to the cloud for playback, ensuring enhanced security and peace of mind.
Dear reoqoo user,If the Camera has a slow response during tracking/left and right rotation, jamming, or abnormal rotation, follow these steps:
1. Screen Clarity and Network Detection: Confirm whether the real-time monitoring screen is set to Super Clear mode. If yes, pay attention to the network speed displayed in the upper left corner of the screen. If the network speed is not 300KB/S or above, it is recommended that you temporarily adjust it to HD or smooth image quality mode for observation. If the problem is resolved, it may be due to insufficient network bandwidth on the device side.
2. Network Environment Switch Verification: To eliminate the impact of the network environment, switch the network mode of your mobile phone from Wi-Fi to mobile phone traffic and restart the App to view it again. Alternatively, you can disconnect and restart the router connected to the device to refresh the network connection environment.
3. Wi-Fi Signal Optimization: If you currently use a Wi-Fi connection, check the distance between the Camera and the router and the physical barrier. If the distance between the two is more than 8 meters, or there are multiple wall barriers in the middle, the Wi-Fi signal quality may be affected. In this case, you are recommended to use a wired connection (i.e., directly connect the Camera to the router via a network cable) to ensure stable and efficient network transmission.
Dear reoqoo user, if the issue persists after attempting the steps mentioned above, don’t worry. We understand your frustration and are here to help. To better assist you, please click on the problem feedback and provide the following:
1. A detailed description of the issue.
2. Video or screenshot evidence of the device malfunction.
Upon receipt, we’ll promptly investigate and address your concern and ensure a swift resolution.
Dear reoqoo user,If the Camera experiences abnormal rotation, follow these steps to troubleshoot:
1. Tracking Check:
• Confirm if the human or motion tracking feature is enabled, causing the Camera to automatically follow targets.
• Open the reoqoo App, enter the camera monitoring page, and click the top right “∷” icon to enter the settings interface.
• Find and disable the "Motion Tracking" option under “Smart Home Guarding.”
• Verify if other family members or shared account friends are remotely controlling the pan-tilt rotation.
2. Account Security Verification:
• Check if this account is logged in on other mobile devices.
• Open the reoqoo App, click the "Mine" button in the bottom right corner, then click on the displayed phone number at the top of the page to enter the “Account Security” area.
• Promptly change the password or revoke login permissions from unused devices to prevent unauthorized operations.
Dear reoqoo user, if the issue persists after attempting the steps mentioned above, don’t worry. We understand your frustration and are here to help. To better assist you, please click on the problem feedback and provide the following:
1. A detailed description of the issue.
2. Video or screenshot evidence of the device malfunction.
Upon receipt, we’ll promptly investigate and address your concern and ensure a swift resolution.